Scan a NodeJS App for security vulnerabilities
DevSecOps Background
The DevSecOps movement is all about shifting left; empowering the development teams to make more hygienic decisions. With the pace and velocity that engineering teams are creating changes/features, in days gone by, security could be seen as an afterthought in the SDLC. Today, modern teams and organizations try to disseminate application security expertise throughout the development pipeline and security decisions and posture are being educated upfront during development.
There are a few categories of application centric security tools out there. The first is SAST or Static Application Security Testing. SAST tools typically inspect application code and configuration for known good and bad patterns. The second type, DAST or Dynamic Application Security Testing, tool will try to perform an exploit on your behalf. DAST tools typically run against running applications, having the ability to take into compensating controls of the infrastructure. Third are RASPs or Runtime Application Self Protection Platforms are dependencies deployed with your application which will analyze calls in and out of the application e.g method calls.
Setting Up Your First Automatable Security Scan
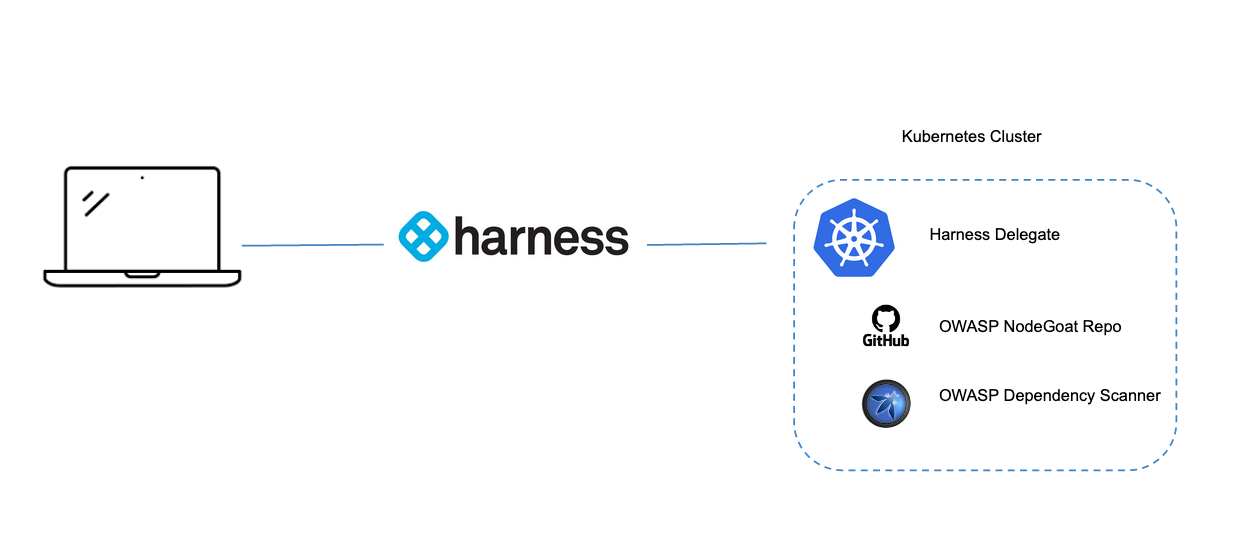
In this example, we will be using OWASP Dependency Check (SAST tool) which will match project dependencies against vulnerability databases such as the National Vulnerability Database (NVD). We will be scanning against OWASP’s own NodeGoat project, which is a purpose-built vulnerable Node application to teach security concepts. You can replace NodeGoat with an application of your choice.
Install Delegate
Harness will facilitate the running of the security scan against your codebase. A workload runner, e.g. a Harness Delegate will need to be installed into a Kubernetes cluster of your choice. The first step is to request a Harness Security Test Orchestration Account and install a Harness Delegate.
Install Delegate
What is Harness Delegate?
Harness Delegate is a lightweight worker process that is installed on your infrastructure and communicates only via outbound HTTP/HTTPS to the Harness Platform. This enables the Harness Platform to leverage the delegate to execute the CI/CD and other tasks on your behalf, without any of your secrets leaving your network.
You can install the Harness Delegate on either Docker or Kubernetes.
Install Harness Delegate
Create a new delegate token
Log in to the Harness Platform and go to Account Settings -> Account Resources -> Delegates. Select the Tokens tab. Select +New Token, and enter a token name, for example firstdeltoken. Select Apply. Harness Platform generates a new token for you. Select Copy to copy and store the token in a temporary file. You will provide this token as an input parameter in the next installation step. The delegate will use this token to authenticate with the Harness Platform.
Get your Harness account ID
Along with the delegate token, you will also need to provide your Harness accountId as an input parameter during delegate installation. This accountId is present in every Harness URL. For example, in the following URL:
https://app.harness.io/ng/#/account/6_vVHzo9Qeu9fXvj-AcQCb/settings/overview
6_vVHzo9Qeu9fXvj-AcQCb is the accountId.
Now you are ready to install the delegate on either Docker or Kubernetes.
- Kubernetes
- Docker
Prerequisite
Ensure that you have access to a Kubernetes cluster. For the purposes of this tutorial, we will use minikube.
Install minikube
- On Windows:
choco install minikube
- On macOS:
brew install minikube
Now start minikube with the following config.
minikube start --memory 4g --cpus 4
Validate that you have kubectl access to your cluster.
kubectl get pods -A
Now that you have access to a Kubernetes cluster, you can install the delegate using any of the options below.
- Helm Chart
- Terraform Helm Provider
- Kubernetes Manifest
Install the Helm chart
As a prerequisite, you must have Helm v3 installed on the machine from which you connect to your Kubernetes cluster.
You can now install the delegate using the delegate Helm chart. First, add the harness-delegate Helm chart repo to your local Helm registry.
helm repo add harness-delegate https://app.harness.io/storage/harness-download/delegate-helm-chart/
helm repo update
helm search repo harness-delegate
We will use the harness-delegate/harness-delegate-ng chart in this tutorial.
NAME                                    CHART VERSION   APP VERSION DESCRIPTION
harness-delegate/harness-delegate-ng    1.0.8           1.16.0      A Helm chart for deploying harness-delegate
Now we are ready to install the delegate. The following example installs/upgrades firstk8sdel delegate (which is a Kubernetes workload) in the harness-delegate-ng namespace using the harness-delegate/harness-delegate-ng Helm chart.
To install the delegate, do the following:
In Harness, select Deployments, then select your project.
Select Delegates under Project Setup.
Select Install a Delegate to open the New Delegate dialog.
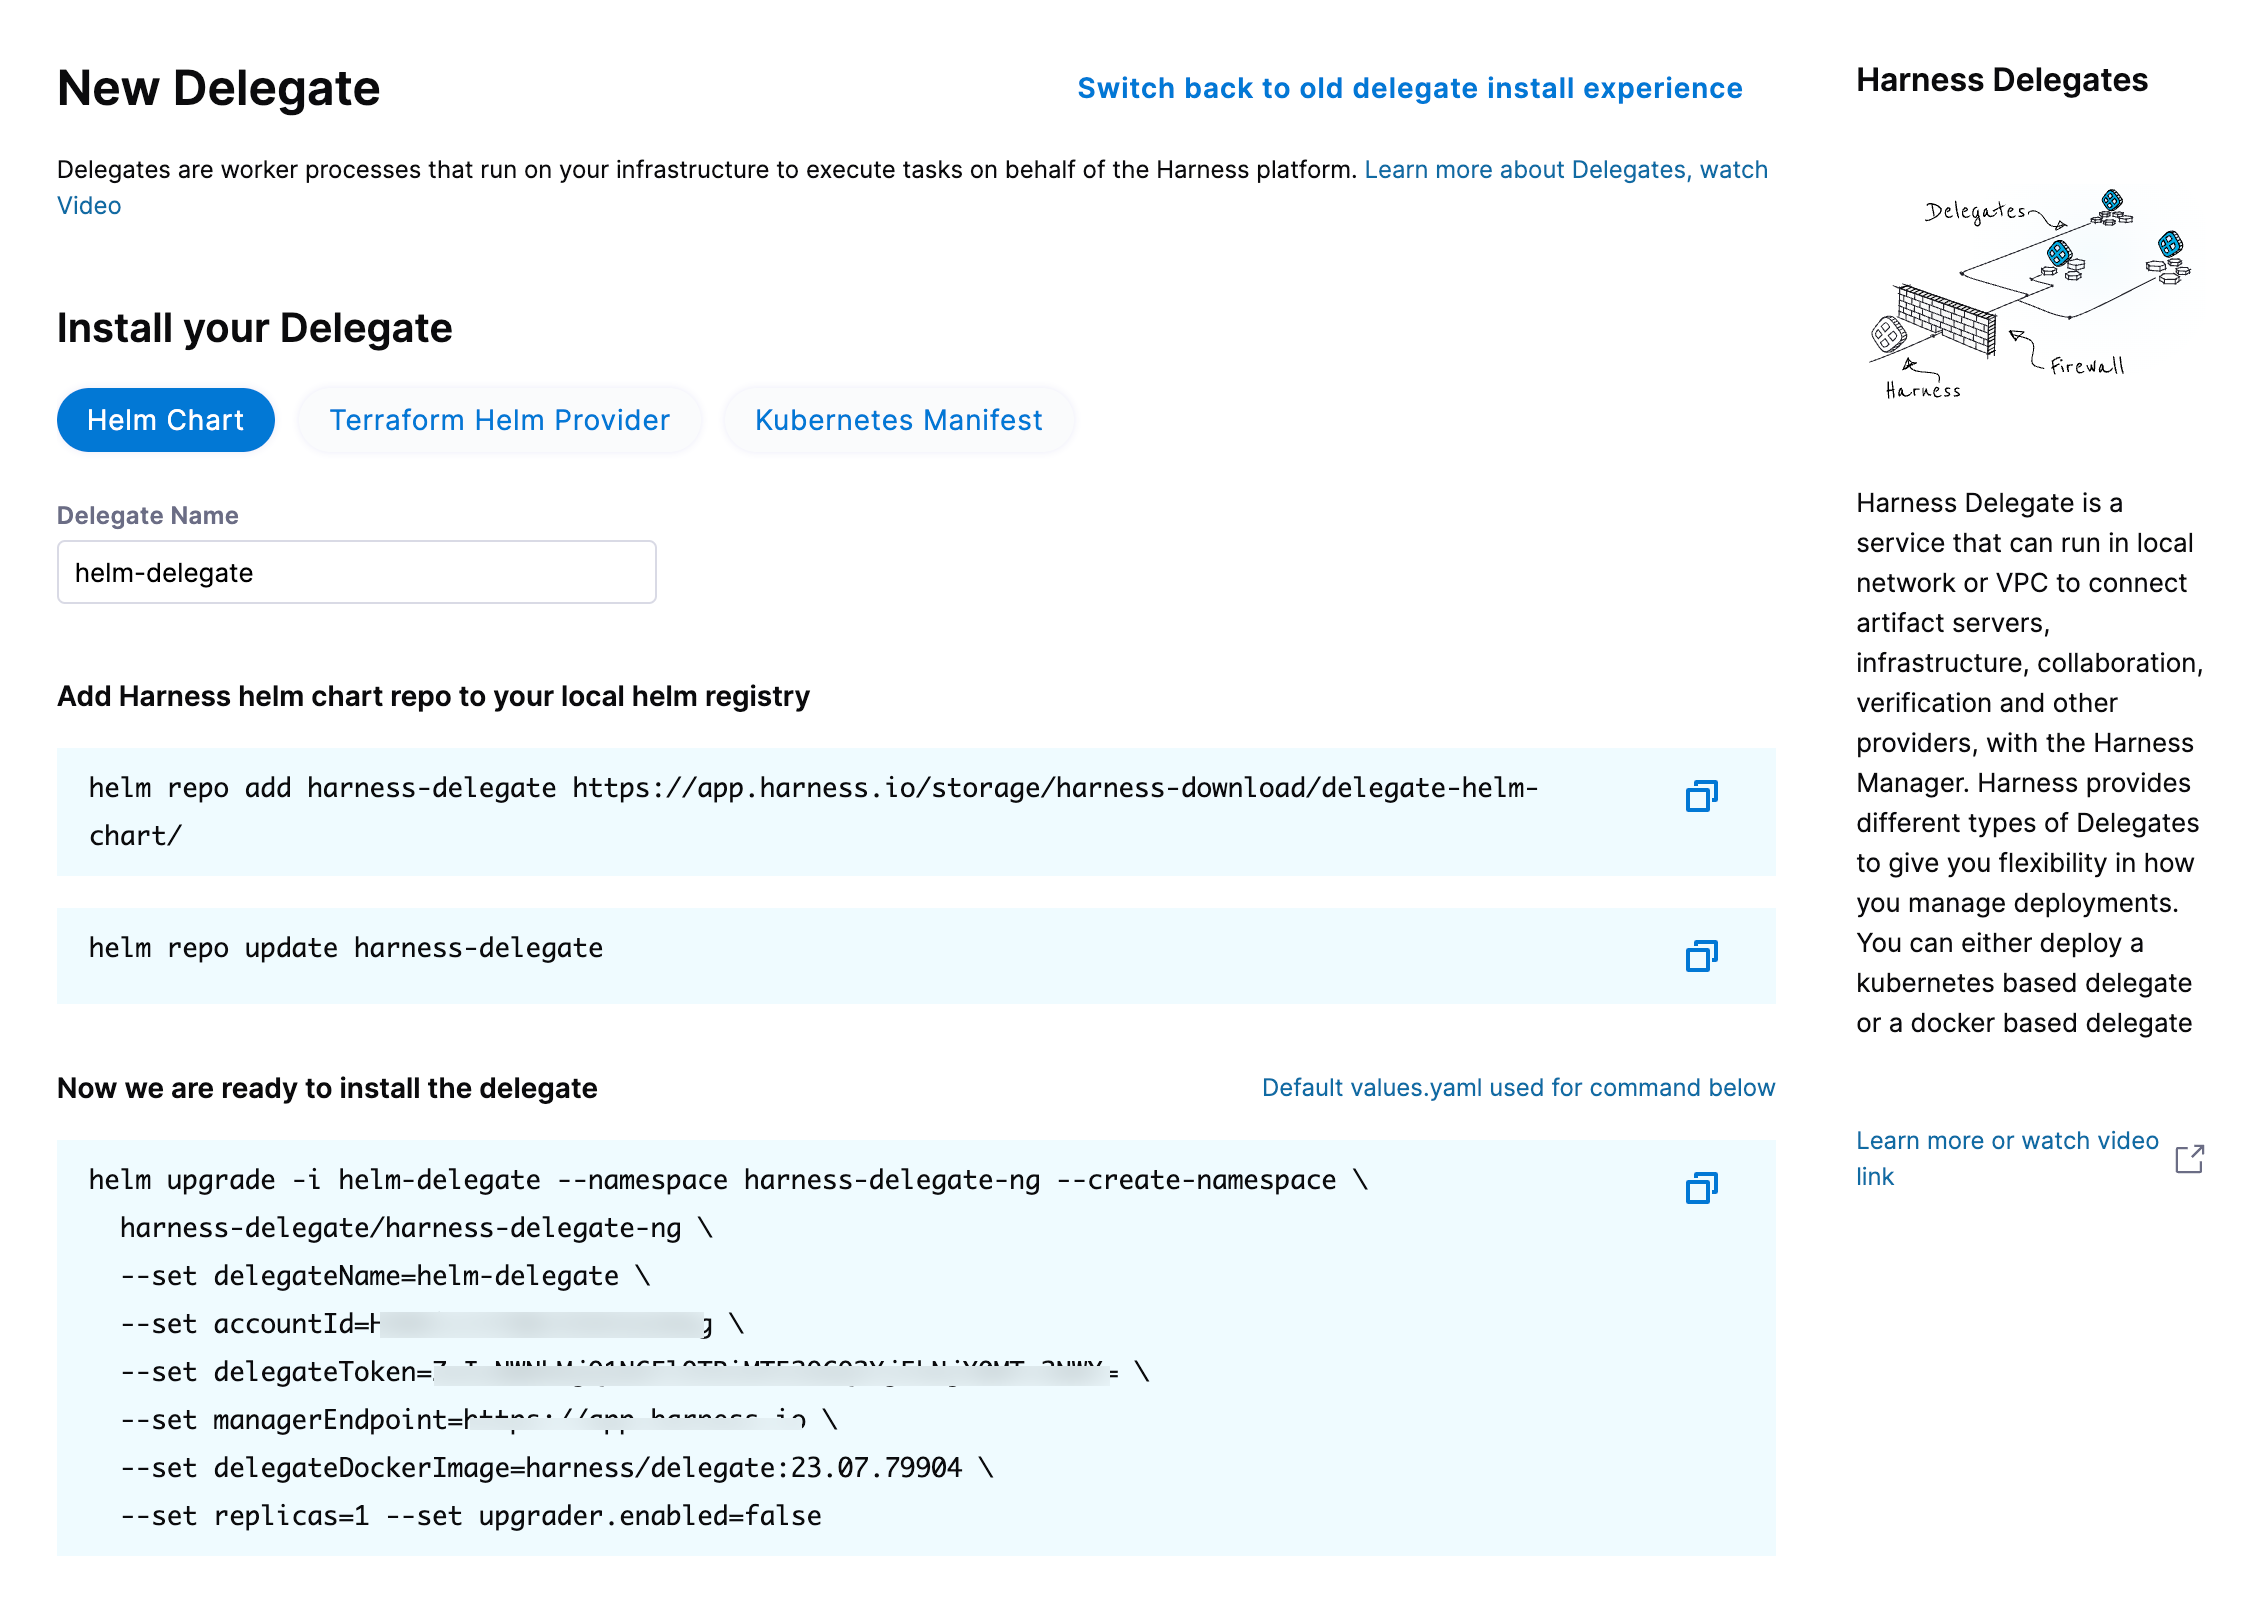
Select Helm Chart under Install your Delegate.
Copy the
helm upgradecommand.Run the command.
The command uses the default values.yaml located in the delegate-helm-chart GitHub repo. If you want change one or more values in a persistent manner instead of the command line, you can download and update the values.yaml file as per your need. You can use the updated values.yaml file as shown below.
helm upgrade -i firstk8sdel --namespace harness-delegate-ng --create-namespace \
  harness-delegate/harness-delegate-ng \
  -f values.yaml \
  --set delegateName=firstk8sdel \
  --set accountId=PUT_YOUR_HARNESS_ACCOUNTID_HERE \
  --set delegateToken=PUT_YOUR_DELEGATE_TOKEN_HERE \
  --set managerEndpoint=PUT_YOUR_MANAGER_HOST_AND_PORT_HERE \
  --set delegateDockerImage=harness/delegate:23.02.78306 \
  --set replicas=1 --set upgrader.enabled=false
Create main.tf file
Harness uses a Terraform module for the Kubernetes delegate. This module uses the standard Terraform Helm provider to install the Helm chart onto a Kubernetes cluster whose config by default is stored in the same machine at the ~/.kube/config path. Copy the following into a main.tf file stored on a machine from which you want to install your delegate.
module "delegate" {
  source = "harness/harness-delegate/kubernetes"
  version = "0.1.5"

  account_id = "PUT_YOUR_HARNESS_ACCOUNTID_HERE"
  delegate_token = "PUT_YOUR_DELEGATE_TOKEN_HERE"
  delegate_name = "firstk8sdel"
  namespace = "harness-delegate-ng"
  manager_endpoint = "PUT_YOUR_MANAGER_HOST_AND_PORT_HERE"
  delegate_image = "harness/delegate:23.02.78306"
  replicas = 1
  upgrader_enabled = false

  # Additional optional values to pass to the helm chart
  values = yamlencode({
    javaOpts: "-Xms64M"
  })
}

provider "helm" {
  kubernetes {
    config_path = "~/.kube/config"
  }
}
Now replace the variables in the file with your Harness accound ID and delegate token values. Replace PUT_YOUR_MANAGER_HOST_AND_PORT_HERE with the Harness Manager Endpoint noted below. For Harness SaaS accounts, you can find your Harness Cluster Location on the Account Overview page under the Account Settings section of the left navigation. For Harness CDCE, the endpoint varies based on the Docker vs. Helm installation options.
| Harness Cluster Location | Harness Manager Endpoint on Harness Cluster |
|---|---|
| SaaS prod-1 | https://app.harness.io |
| SaaS prod-2 | https://app.harness.io/gratis |
| SaaS prod-3 | https://app3.harness.io |
| CDCE Docker | http://<HARNESS_HOST> if Docker Delegate is remote to CDCE or http://host.docker.internal if Docker Delegate is on same host as CDCE |
| CDCE Helm | http://<HARNESS_HOST>:7143 where HARNESS_HOST is the public IP of the Kubernetes node where CDCE Helm is running |
Run Terraform init, plan, and apply
Initialize Terraform. This downloads the Terraform Helm provider to your machine.
terraform init
Run the following step to view the changes Terraform is going to make on your behalf.
terraform plan
Finally, run this step to make Terraform install the Kubernetes delegate using the Helm provider.
terraform apply
When prompted by Terraform if you want to continue with the apply step, type yes, and then you will see output similar to the following.
helm_release.delegate: Creating...
helm_release.delegate: Still creating... [10s elapsed]
helm_release.delegate: Still creating... [20s elapsed]
helm_release.delegate: Still creating... [30s elapsed]
helm_release.delegate: Still creating... [40s elapsed]
helm_release.delegate: Still creating... [50s elapsed]
helm_release.delegate: Still creating... [1m0s elapsed]
helm_release.delegate: Creation complete after 1m0s [id=firstk8sdel]

Apply complete! Resources: 1 added, 0 changed, 0 destroyed.
Download a Kubernetes manifest template
curl -LO https://raw.githubusercontent.com/harness/delegate-kubernetes-manifest/main/harness-delegate.yaml
Replace variables in the template
Open the harness-delegate.yaml file in a text editor and replace PUT_YOUR_DELEGATE_NAME_HERE, PUT_YOUR_HARNESS_ACCOUNTID_HERE, and PUT_YOUR_DELEGATE_TOKEN_HERE with your delegate name (for example, firstk8sdel), Harness accountId, and delegate token values, respectively.
Replace the PUT_YOUR_MANAGER_HOST_AND_PORT_HERE variable with the Harness Manager Endpoint noted below. For Harness SaaS accounts, you can find your Harness Cluster Location on the Account Overview page under the Account Settings section of the left navigation. For Harness CDCE, the endpoint varies based on the Docker vs. Helm installation options.
| Harness Cluster Location | Harness Manager Endpoint on Harness Cluster |
|---|---|
| SaaS prod-1 | https://app.harness.io |
| SaaS prod-2 | https://app.harness.io/gratis |
| SaaS prod-3 | https://app3.harness.io |
| CDCE Docker | http://<HARNESS_HOST> if Docker Delegate is remote to CDCE or http://host.docker.internal if Docker Delegate is on same host as CDCE |
| CDCE Helm | http://<HARNESS_HOST>:7143 where HARNESS_HOST is the public IP of the Kubernetes node where CDCE Helm is running |
Apply the Kubernetes manifest
kubectl apply -f harness-delegate.yaml
Prerequisite
Ensure that you have the Docker runtime installed on your host. If not, use one of the following options to install Docker:
Install on Docker
Now you can install the delegate using the following command.
docker run --cpus=1 --memory=2g \
  -e DELEGATE_NAME=docker-delegate \
  -e NEXT_GEN="true" \
  -e DELEGATE_TYPE="DOCKER" \
  -e ACCOUNT_ID=PUT_YOUR_HARNESS_ACCOUNTID_HERE \
  -e DELEGATE_TOKEN=PUT_YOUR_DELEGATE_TOKEN_HERE \
  -e LOG_STREAMING_SERVICE_URL=PUT_YOUR_MANAGER_HOST_AND_PORT_HERE/log-service/ \
  -e MANAGER_HOST_AND_PORT=PUT_YOUR_MANAGER_HOST_AND_PORT_HERE \
  harness/delegate:23.03.78904
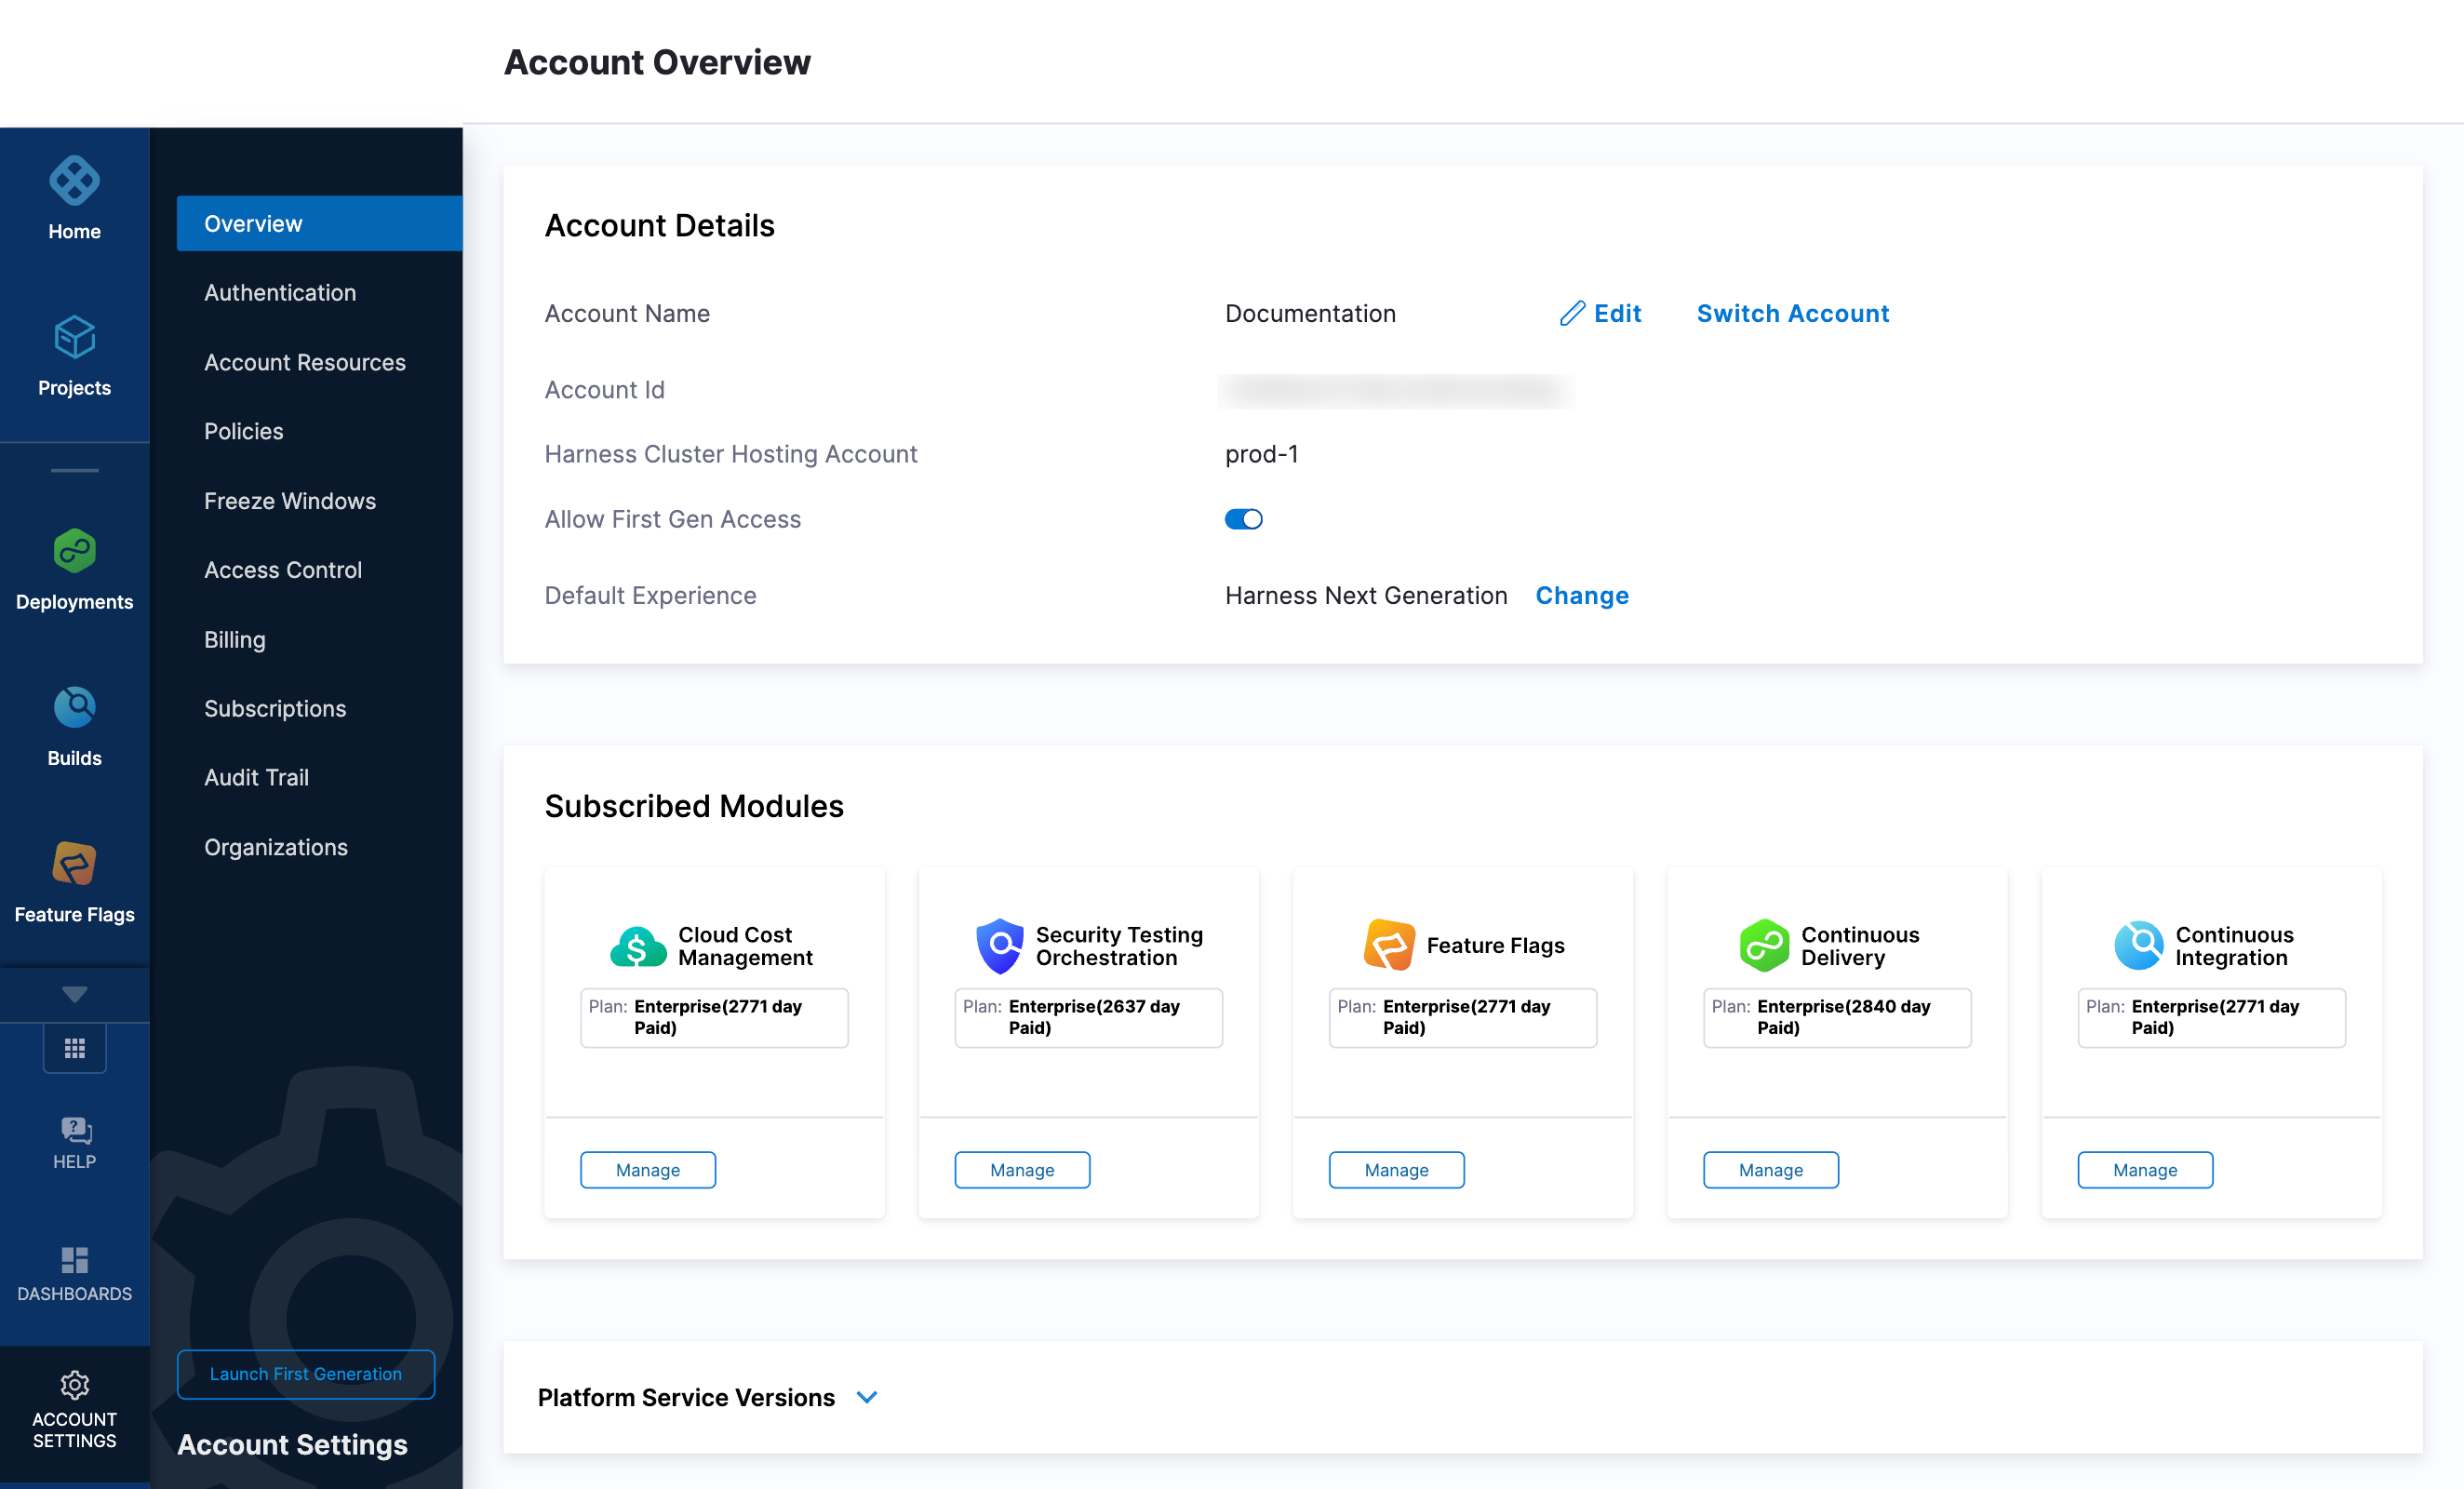
Replace the PUT_YOUR_MANAGER_HOST_AND_PORT_HERE variable with the Harness Manager Endpoint noted below. For Harness SaaS accounts, to find your Harness cluster location, select Account Settings, and then select Overview. In Account Overview, look in Account Settings. It is listed next to Harness Cluster Hosting Account.
For more information, go to View account info and subscribe to downtime alerts.
For Harness CDCE, the endpoint varies based on the Docker vs. Helm installation options.
| Harness Cluster Location | Harness Manager Endpoint on Harness Cluster |
|---|---|
| SaaS prod-1 | https://app.harness.io |
| SaaS prod-2 | https://app.harness.io/gratis |
| SaaS prod-3 | https://app3.harness.io |
| CDCE Docker | http://<HARNESS_HOST> if Docker Delegate is remote to CDCE or http://host.docker.internal if Docker Delegate is on same host as CDCE |
| CDCE Helm | http://<HARNESS_HOST>:7143 where HARNESS_HOST is the public IP of the Kubernetes node where CDCE Helm is running |
If you are using a local runner CI build infrastructure, modify the delegate install command as explained in Use local runner build infrastructure
Deploy using a custom role
During delegate installation, you have the option to deploy using a custom role. To use a custom role, you must edit the delegate YAML file.
Harness supports the following custom roles:
cluster-admincluster-viewernamespace-admin- custom cluster roles
To deploy using a custom cluster role, do the following:
Open the delegate YAML file in your text editor.
Add the custom cluster role to the
roleReffield in the delegate YAML.---
apiVersion: rbac.authorization.k8s.io/v1beta1
kind: ClusterRoleBinding
metadata:
name: harness-delegate-cluster-admin
subjects:
- kind: ServiceAccount
name: default
namespace: harness-delegate-ng
roleRef:
kind: ClusterRole
name: cluster-admin
apiGroup: rbac.authorization.k8s.io
---In this example, the
cluster-adminrole is defined.Save the delegate YAML file.
Verify delegate connectivity
Select Continue. After the health checks pass, your delegate is available for you to use. Select Done and verify your new delegate is listed.
Helm chart & Terraform Helm provider

Kubernetes manifest

Docker

You can now route communication to external systems in Harness connectors and pipelines by selecting this delegate via a delegate selector.
Delegate selectors do not override service infrastructure connectors. Delegate selectors only determine the delegate that executes the operations of your pipeline.
Troubleshooting
The delegate installer provides troubleshooting information for each installation process. If the delegate cannot be verified, select Troubleshoot for steps you can use to resolve the problem. This section includes the same information.
Harness asks for feedback after the troubleshooting steps. You are asked, Did the delegate come up?
If the steps did not resolve the problem, select No, and use the form to describe the issue. You'll also find links to Harness Support and to Delegate docs.
- Helm Chart
- Terraform Helm Provider
- Kubernetes Manifest
- Docker
Use the following steps to troubleshoot your installation of the delegate using Helm.
Verify that Helm is correctly installed:
Check for Helm:
helmAnd then check for the installed version of Helm:
helm versionIf you receive the message
Error: rendered manifests contain a resource that already exists..., delete the existing namespace, and retry the Helm upgrade command to deploy the delegate.For further instructions on troubleshooting your Helm installation, go to Helm troubleshooting guide.
Check the status of the delegate on your cluster:
kubectl describe pods -n <namespace>If the pod did not start, check the delegate logs:
kubectl logs -f <harnessDelegateName> -n <namespace>If the state of the delegate pod is
CrashLoopBackOff, check your allocation of compute resources (CPU and memory) to the cluster. A state ofCrashLoopBackOffindicates insufficent Kubernetes cluster resources.If the delegate pod is not healthy, use the
kubectl describecommand to get more information:kubectl describe <pod_name> -n <namespace>
Use the following steps to troubleshoot your installation of the delegate using Terraform.
Verify that Terraform is correctly installed:
terraform -versionFor further instructions on troubleshooting your installation of Terraform, go to the Terraform troubleshooting guide.
Check the status of the delegate on your cluster:
kubectl describe pods -n <namespace>If the pod did not start, check the delegate logs:
kubectl logs -f <harnessDelegateName> -n <namespace>If the state of the delegate pod is
CrashLoopBackOff, check your allocation of compute resources (CPU and memory) to the cluster. A state ofCrashLoopBackOffindicates insufficent Kubernetes cluster resources.If the delegate pod is not healthy, use the
kubectl describecommand to get more information:kubectl describe <pod_name> -n <namespace>
Use the following steps to troubleshoot your installation of the delegate using Kubernetes.
Check the status of the delegate on your cluster:
kubectl describe pods -n <namespace>If the pod did not start, check the delegate logs:
kubectl logs -f <harnessDelegateName> -n <namespace>If the state of the delegate pod is
CrashLoopBackOff, check your allocation of compute resources (CPU and memory) to the cluster. A state ofCrashLoopBackOffindicates insufficent Kubernetes cluster resources.If the delegate pod is not healthy, use the
kubectl describecommand to get more information:kubectl describe <pod_name> -n <namespace>
Use the following steps to troubleshoot your installation of the delegate using Docker:
Check the status of the delegate on your cluster:
docker container ls -aIf the pod is not running, check the delegate logs:
docker container logs <delegatename> -fRestart the delegate container. To stop the container:
docker container stop <delegatename>To start the container:
docker container start <delegatename>Make sure the container has sufficient CPU and memory resources. If not, remove the older containers:
docker container rm [container id]
Security Tests Pipeline
With the Delegate installation out of the way, next is to create a Pipeline that will just run your security scan. Harness runs off the concept of Projects which are logical groupings of resources. The Default Project which is created for you upon account signup can be used for this example.
Creating Your First STO Pipeline
To get started with your security scan that can be run in a pipeline, head to the Security Tests module and then Pipelines.
Click + Create Pipeline then give a name to the new Pipeline.
- Name: my_security_scan
- Setup: Inline
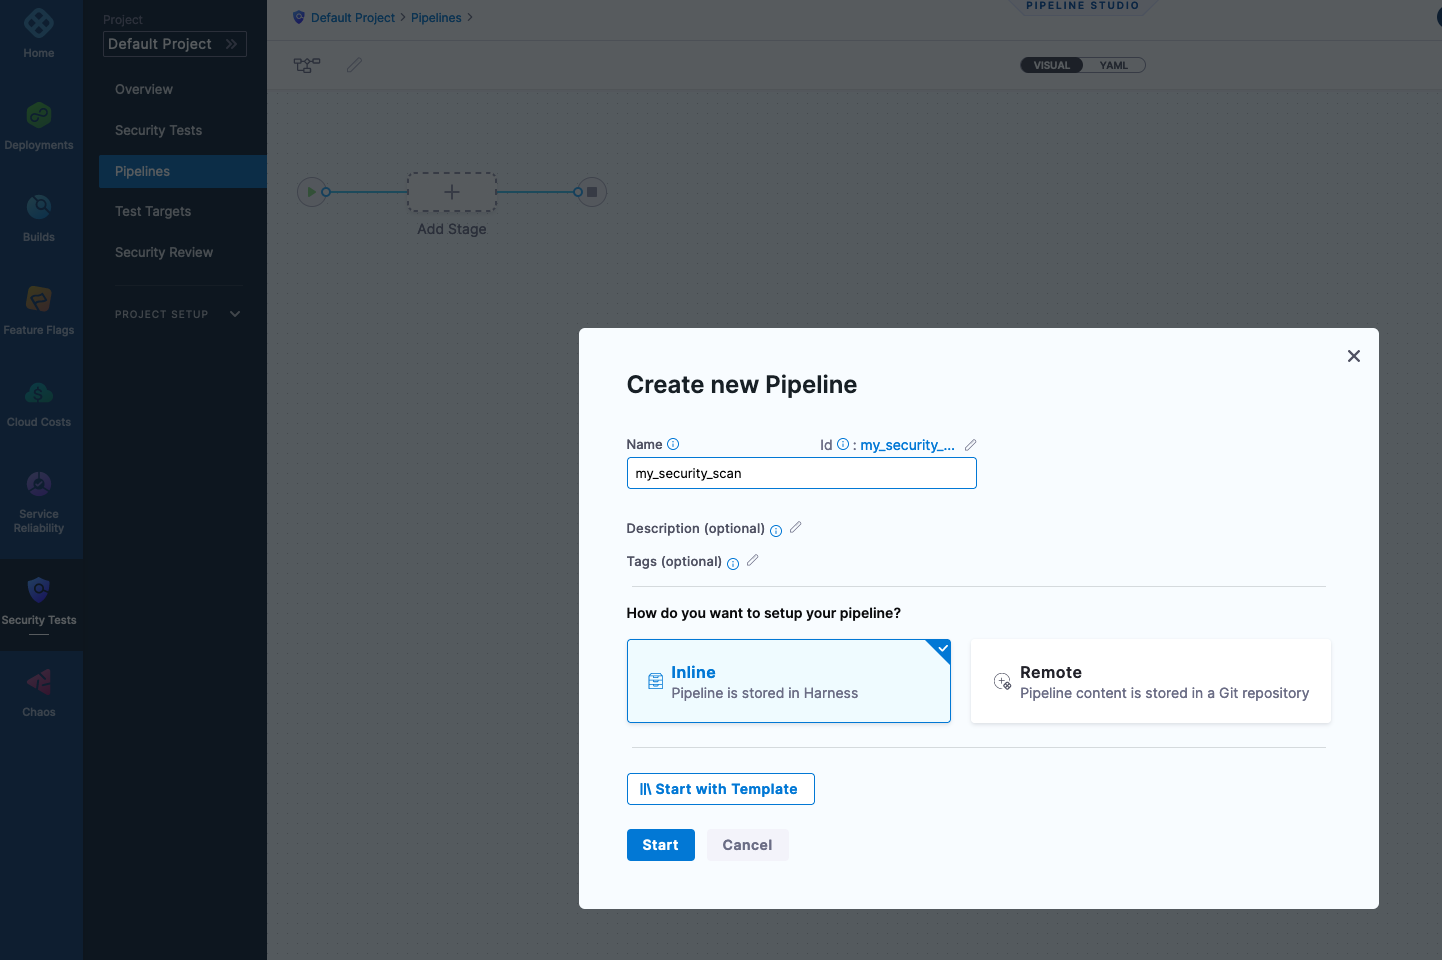
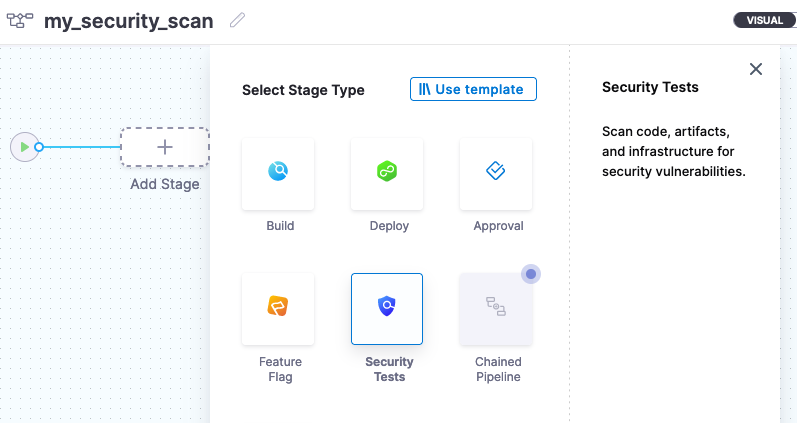
Click start and you will be brought to a canvas to start adding in steps into your Pipeline. Click + Add Stage and select Security Tests.
In the Stage configuration, name the Security Stage and configure connectivity to OWASP’s of your repository which houses the application code base. Harness can clone and execute a scan on your code base.
- Stage Name: owasp_scan
- Clode Codebase: selected (true)
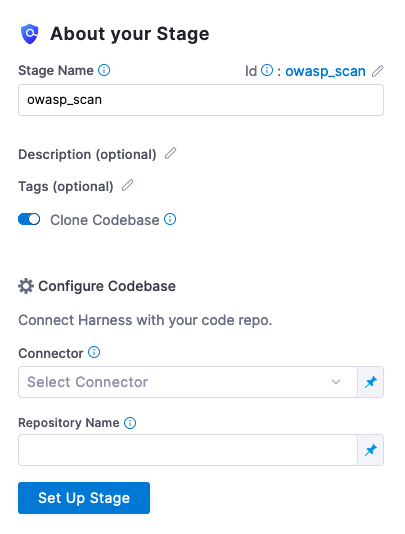
In the Connector section, set up a new GitHub Connector which will allow connectivity to GitHub.
GitHub Connector Configuration
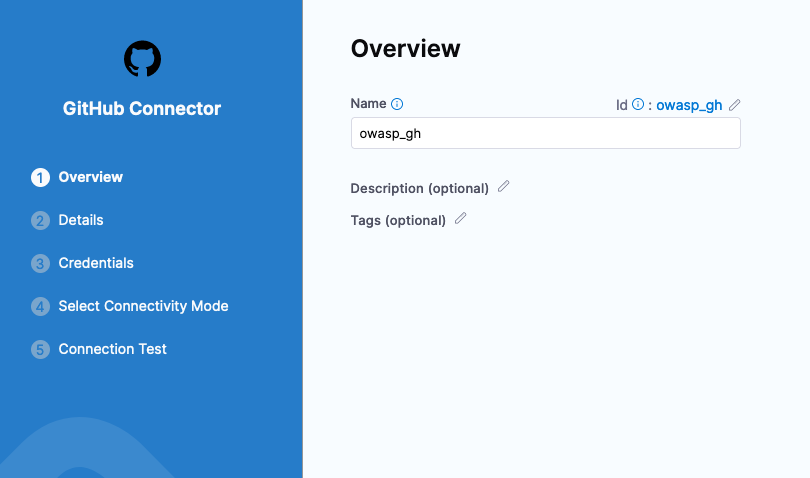
In the connector dropdown, click + New Connector and select the type as GitHub.
Name: owasp_gh
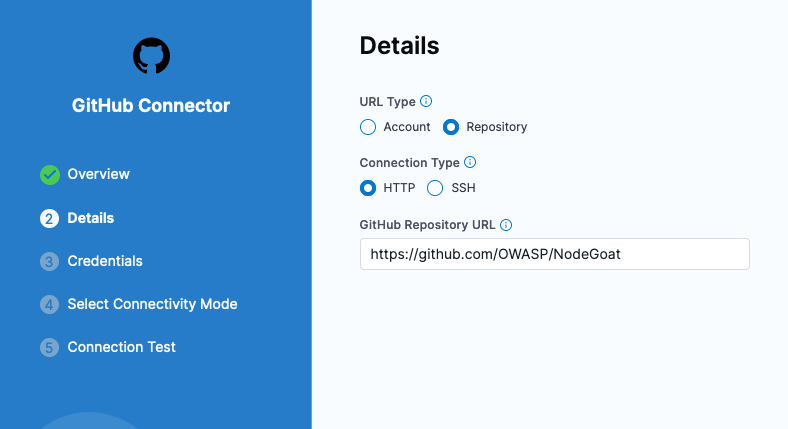
The repository hosting NodeGoat is located at https://github.com/OWASP/NodeGoat. In the details section, can wire this address in.
- URL Type: Repository
- Connection Type: HTTP
- GitHub URL: https://github.com/OWASP/NodeGoat
Click Continue to add the credentials.
GitHub Personal Access Tokens
GitHub as of 2021 requires token authentication e.g. no more passwords for git operations. You’ll need to create a GitHub Personal Access Token to ensure that the pipeline can access the public repository.
If you have not created a Personal Access Token before. GitHub -> Settings -> Developer Settings -> Personal Access Tokens
- Name: harness
- Scopes: repo -> public_repo [or if you are using a private repo or want to enable Harness API Access, scope appropriately]
- Expiration: 30 days
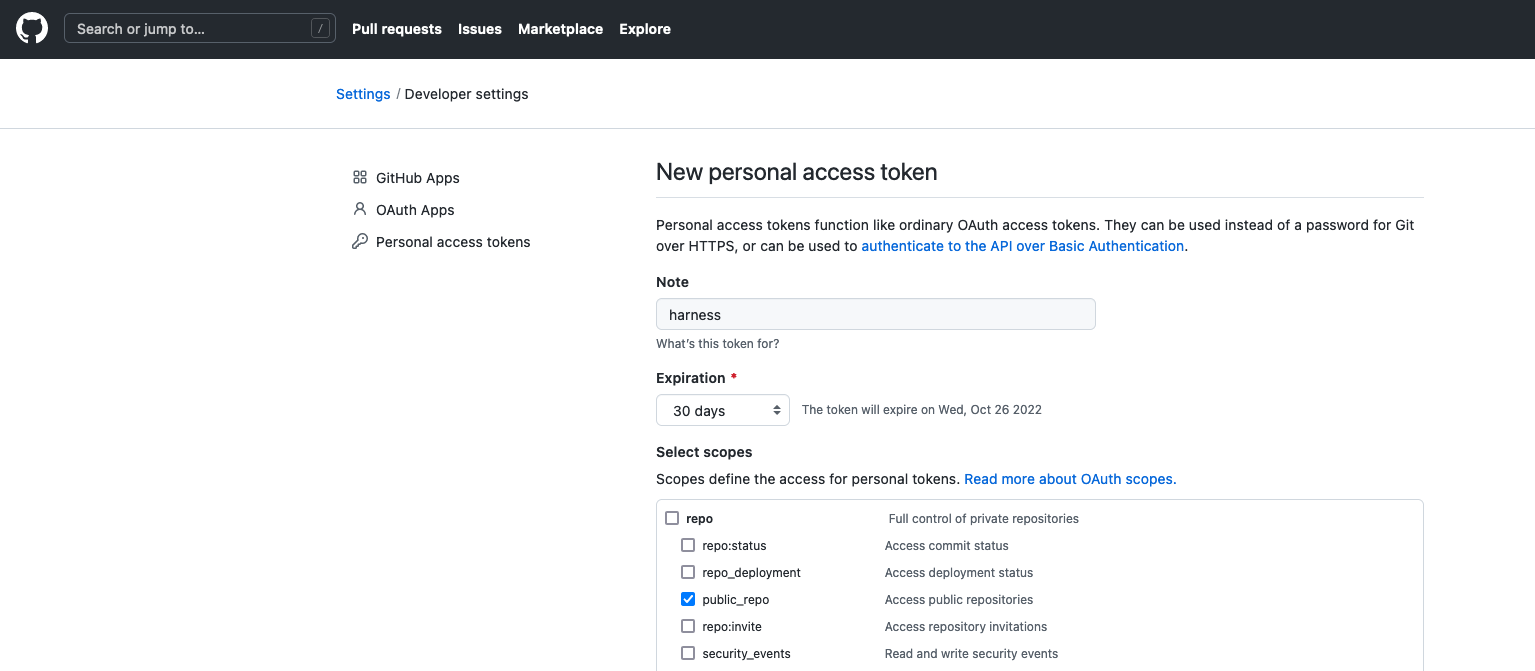
Make sure to copy down the token that is generated.
In the Credentials Section, enter your User Name and your Personal Access Token which will be stored as a Harness Secret.
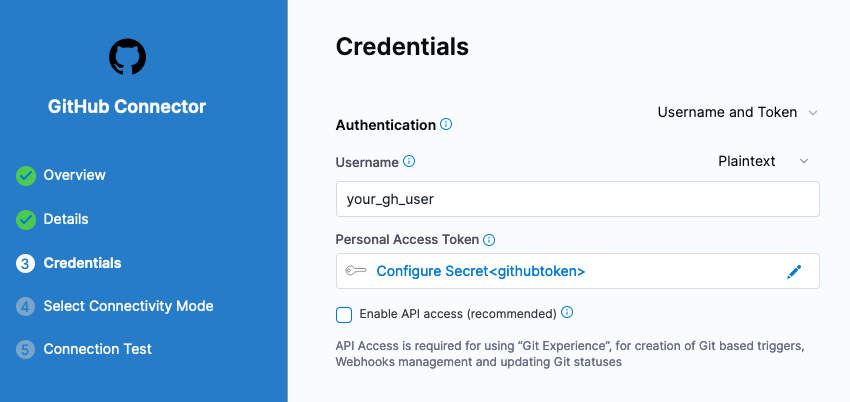
Select Continue and select where you want the Git Commands to be run. Can select the Harness Delegate that you have installed to run the Git Operations. Once selected, Harness will run a quick validation.
Back in the About your Stage section, the Git Connector should be there and can provide the Repository Name, “NodeGoat”.
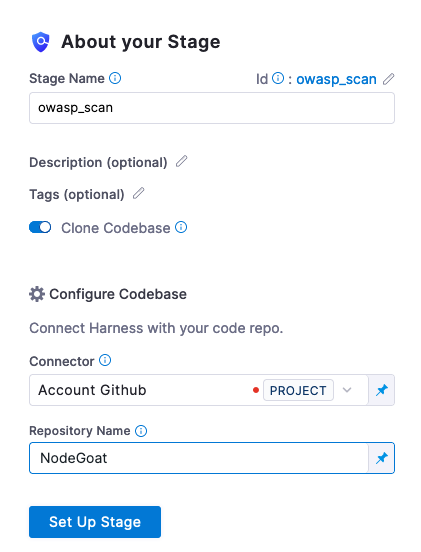
Now click Set Up Stage and we will go through filling in the necessary pieces.
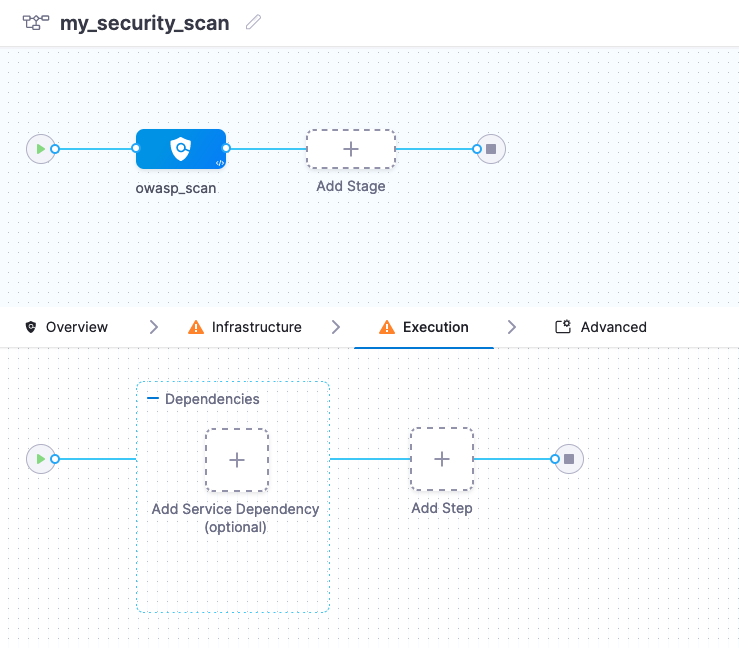
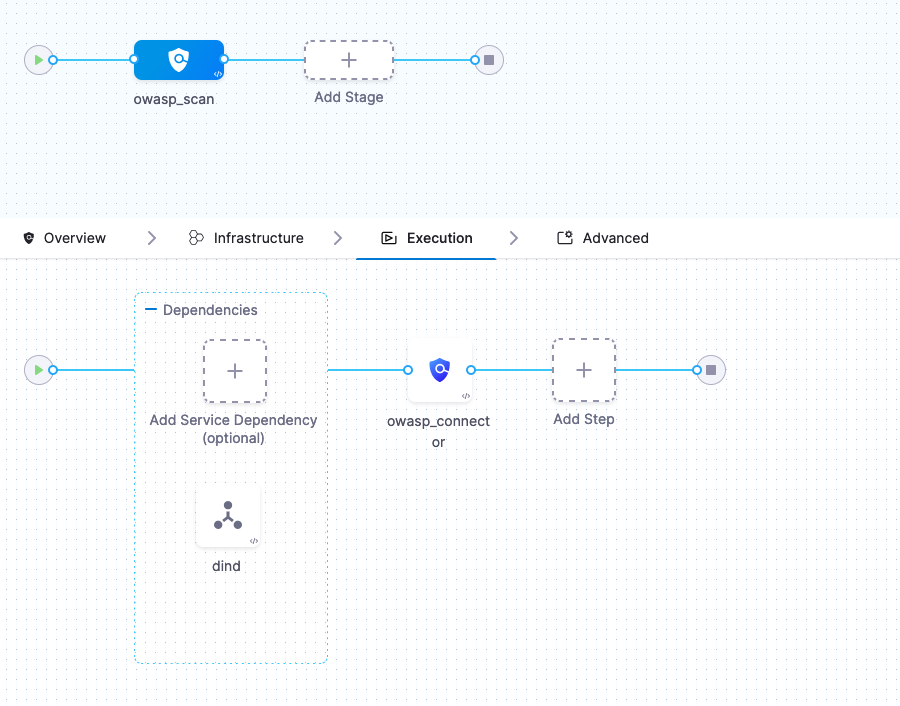
The first step is to wire in a Docker-in-Docker [DIND] image to run the scan.
Configuring Your Security Pipeline
In the + Add Service Dependency Section, configure a Service Dependency.
- Dependency Name: dind
- Container Registry: Harness Docker Connector [this will be there by default, linking up to public Docker Hub]
- Image: docker:dind
- Privileged: True
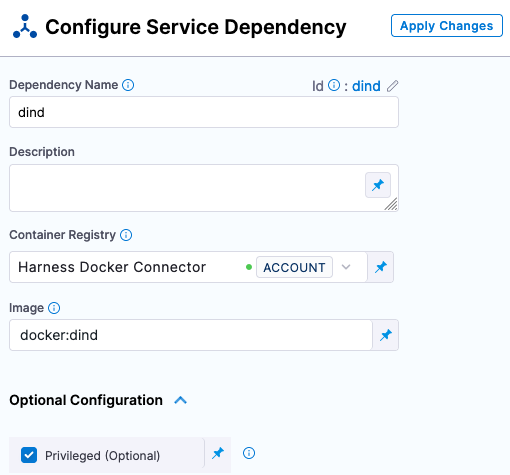
Click Apply Changes, and now can configure the Infrastructure and Execution steps.
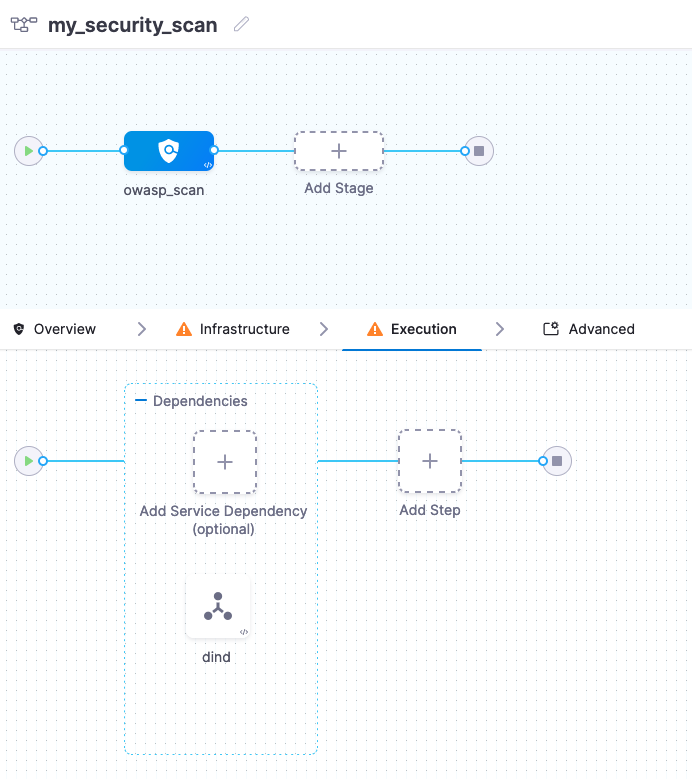
Click on Overview, then add a shared path of '/var/run` to execute the tests in.
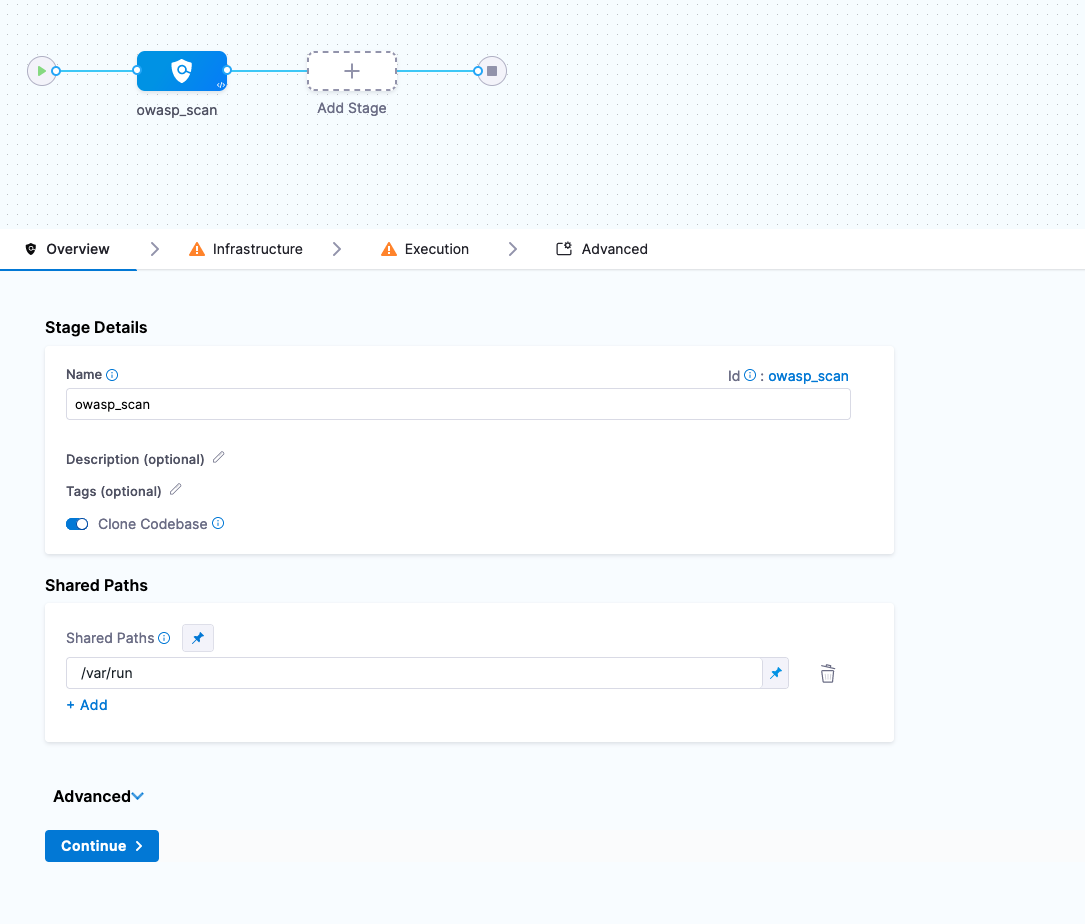
Click Continue to wire in your Kubernetes cluster to run and execute the scan.
Adding a Kubernetes Cluster
With Harness, you can leverage the Harness Delegate that is running in Kubernetes to spin up and down workloads on your behalf.
In the Kubernetes Cluster section, add a New Connector.
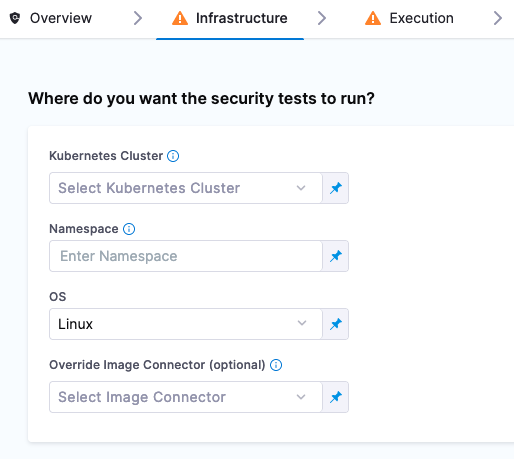
- Name: sto-cluster
- Details: Use credentials of specific Harness Delegate
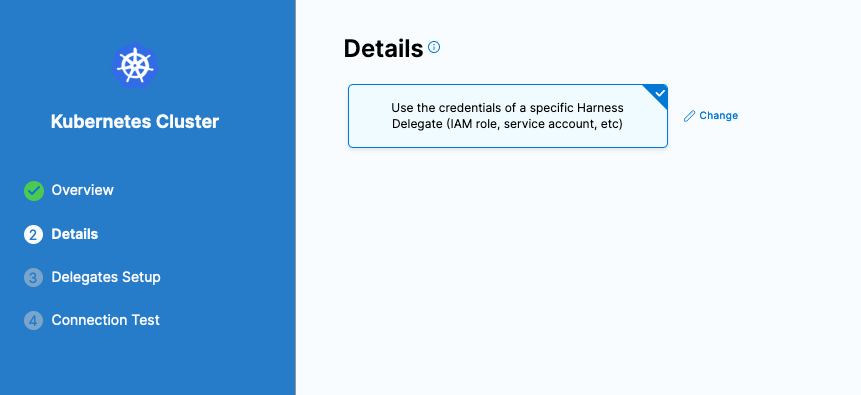
Click Continue and select the Harness Delegate that is running on your Kubernetes cluster. With that selected, connectivity validation will occur. Now specify a Kubernetes Namespace to leverage, in this case “default” is fine.
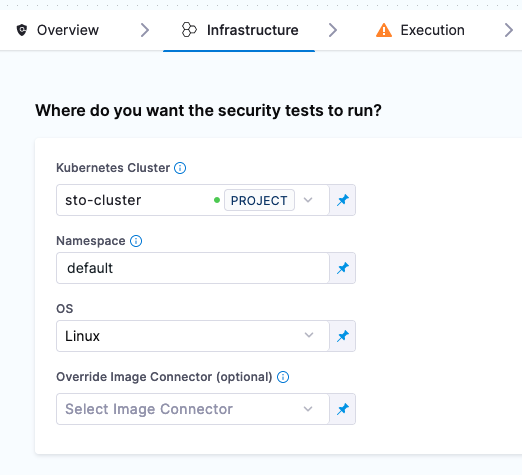
Moving on to the Execution, add a Security Step from the Step Library.
Configuring Security Step
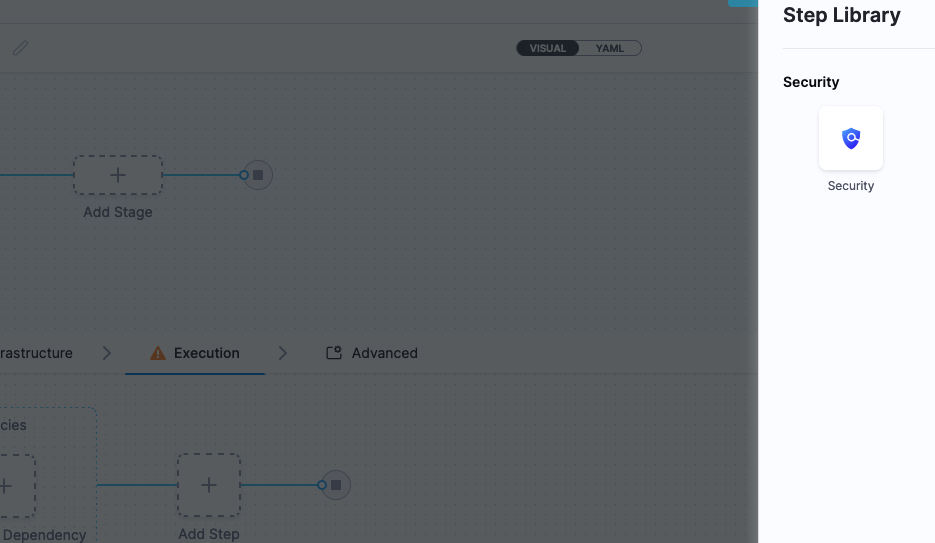
Harness STO orchestrates multiple security scanning tools using scan steps. Setting up each scan step requires details such as the scanner name and the target to scan. You specify these requirements using key-value pairs like this:
- policy_type: orchestratedScan
- scan_type: repository
- product_name: owasp
- product_config_name: default
- repository_project: nodegoat [or what project you have selected]
- repository_branch: <+codebase.branch>
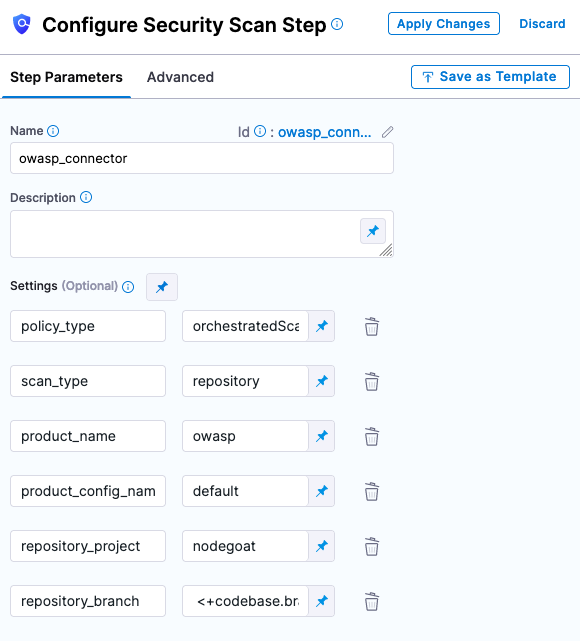
With those filled out, click Apply Changes and you are now ready to run the scan.
Running Your Security Scan Pipeline
Click Save to save your Pipeline Configuration. In “my_security_scan”, click Run.
Security Tests -> Pipelines -> my_security_scan

Per the GitHub Project, the default branch is called master. Can specify master as the Git Branch.
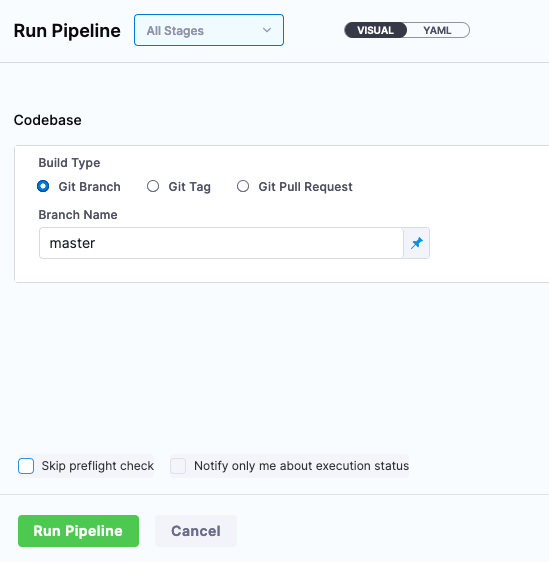
Click Run Pipeline, and your security scan will be executed against the codebase. This execution and scan can take 2-3 minutes to complete.
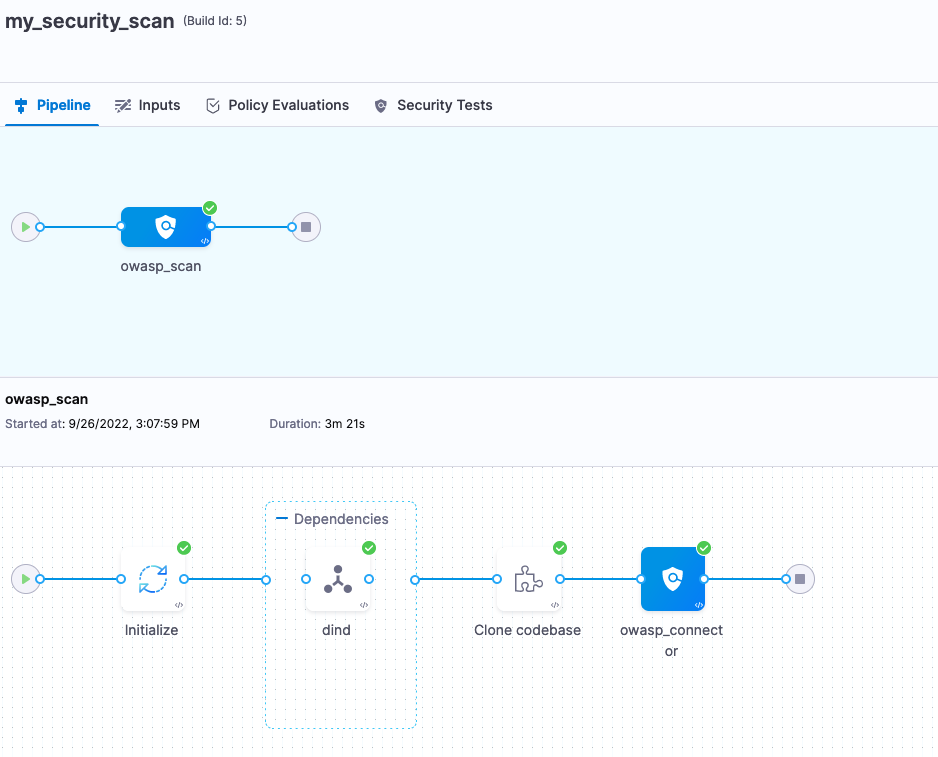
Once executed, you can take a look at the Scan Results. Over time as you make improvements, the scan results will change. Harness STO can help prioritize the criticality of security vulnerabilities for you.
Security Tests -> Security Tests -> latest my_security_scan
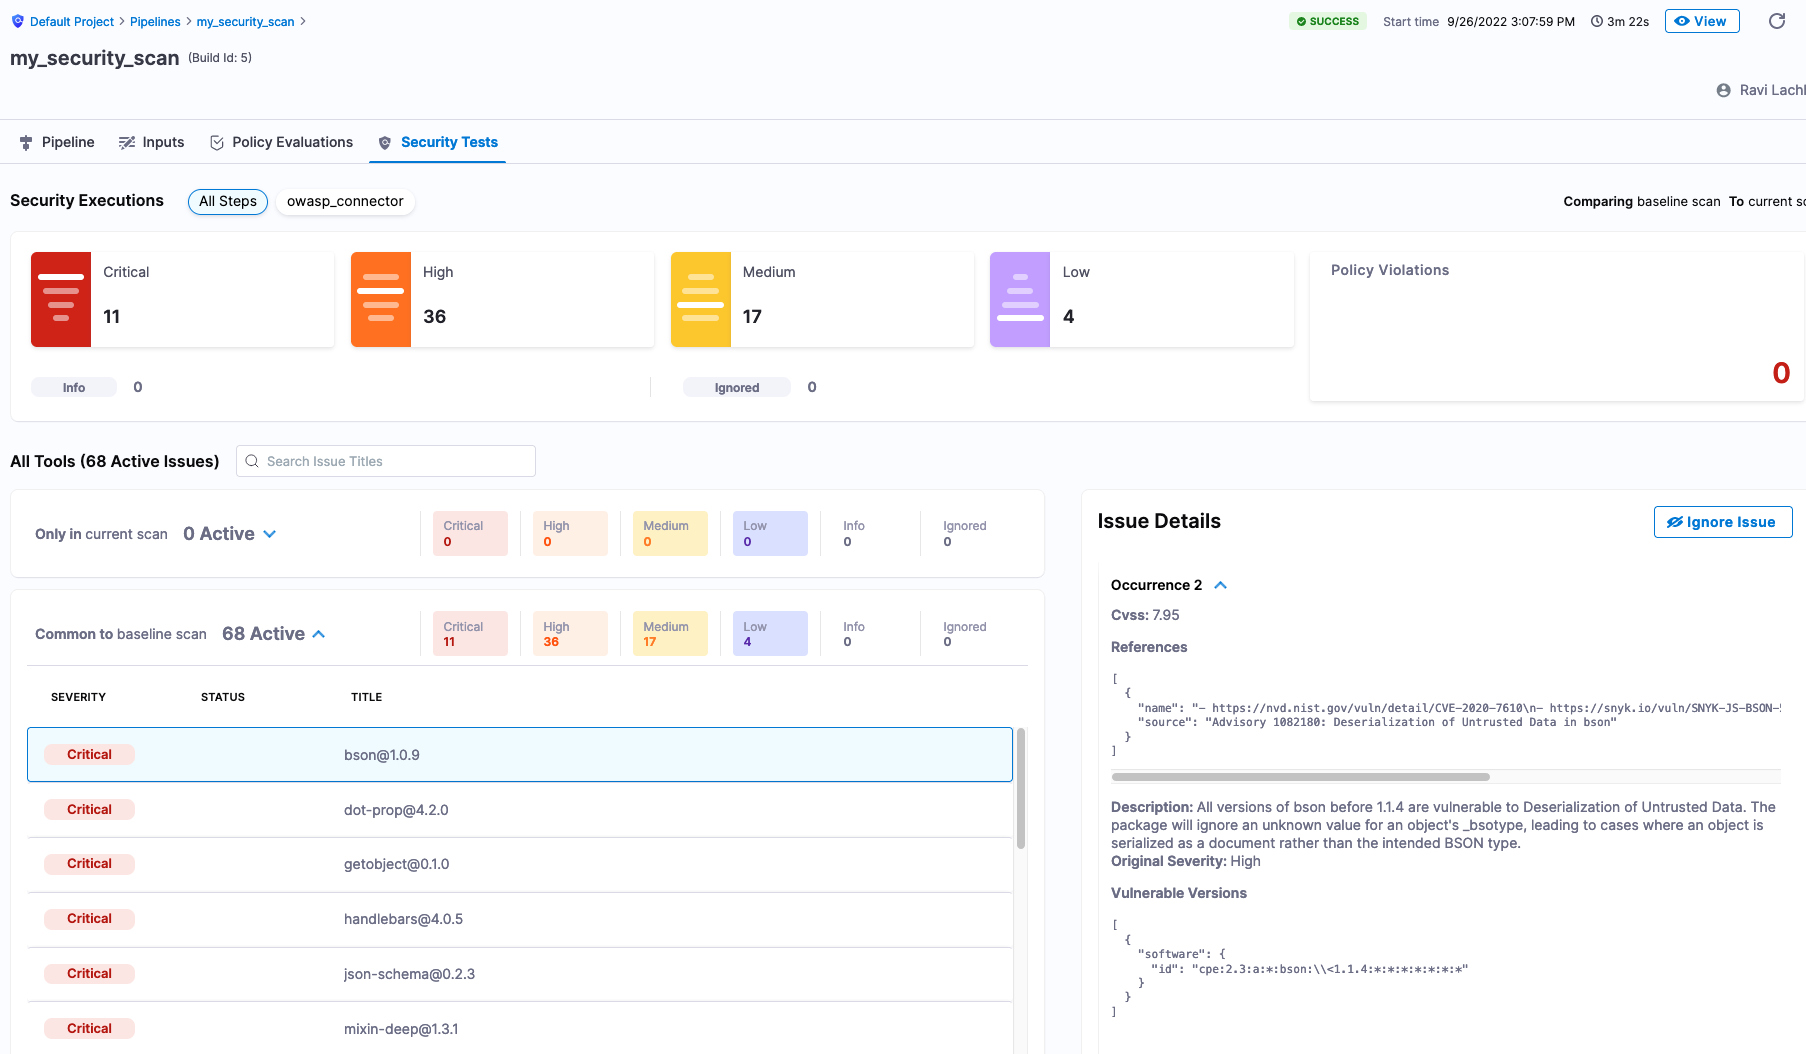
Congratulations on your first security scan placement inside a Pipeline with Harness STO. Harness can help prioritize issues and provide information on how to investigate and fix specific issues.