Integrate Jira in a CI pipeline
To stay aligned and better serve customers, development teams need to understand how a feature is being released, when Jira issues have been deployed, and whether a build has passed or failed. Jira integrations in your CI pipelines provide insights into feature development and release information in Jira by automatically updating the Deployment or Build fields in Jira.
To integrate Harness CI and Jira, install the CI Enterprise by Harness app in your Jira instance, generate an authentication token, and then add a Plugin step to your pipeline. If you haven't created a Harness CI pipeline before, try one of the CI tutorials.
Install the app
The CI Enterprise by Harness app uses the Jira Drone plugin. If you aren't able to install apps in your Jira instance, you can also use the Jira Drone plugin directly in a Plugin step.
- Install the CI Enterprise by Harness app in your Jira instance.
- Go to the CI Enterprise by Harness app configuration page.
- Generate an authentication token, and save it as a Harness text secret.
Add a Plugin step
- Visual
- YAML
- In your CI pipeline's Build stage, add a Plugin step.
- Enter a Name and optional Description.
- For Container Registry, select a container registry connector with Docker Hub access.
- In the Image field, enter
plugins/jira. - Under Optional Configuration, add Settings to configure the Jira plugin's properties for this step, as described in the following table.
| Keys | Required or optional | Description | Value example |
|---|---|---|---|
CONNECT_KEY | Required | An expression referencing your Jira auth token secret. | <+secrets.getValue("jiraKey")> |
PROJECT | Required | Your Jira project key. For example, a project called My Test might have a project key of MYT. | MYT |
INSTANCE | Required | Your Jira hostname prefix, such as myorg in myorg.atlassian.net. | myorg |
ENVIRONMENT_NAME | Optional | If included, Harness updates the Jira Deployment field when there is a deployment to the specified environment. If omitted, Harness updates the Jira Build field. | production |
STATE | Optional | If included, Harness updates Jira only if builds/deployments achieve the specified status. Accepted values include: pending, in_progress, cancelled, failed, rolled_back, or successful.If omitted, Harness updates Jira for all build/deployments, regardless of status. | successful |
LOG_LEVEL | Optional | Either debug or info.Set to debug to print the response from Jira in the build logs. | debug |
The following YAML example describes a Plugin step in a CI stage that updates the Jira Build field when there is a successful build.
              - step:
                  type: Plugin
                  name: Update Jira Build #Step name
                  identifier: updateJiraBuild #Step ID
                  spec:
                    connectorRef: account.harnessImage #Docker Hub container registry connector
                    image: plugins/jira
                    settings:
                      PROJECT: MYT #Your Jira project key
                      CONNECT_KEY: <+secrets.getValue("jiraKey")> #Jira authentication token secret
                      INSTANCE: myorg #Your Jira instance hostname
                      STATE: successful #Optional: Update Jira only when builds succeed
To update the Jira Deployment field, instead of the Build field, include ENVIRONMENT_NAME, such as:
ENVIRONMENT_NAME: production
Plugin step specifications
type: Pluginname:Specify a step name.identifier:Specify a unique step ID.connectorRef:Specify a Docker Hub container registry connector.image: plugins/jirasettings:Add environment variables to configure the Jira plugin's properties for this step, as described in the following table.
| Keys | Required or optional | Description | Value example |
|---|---|---|---|
CONNECT_KEY | Required | An expression referencing your Jira auth token secret. | <+secrets.getValue("jiraKey")> |
PROJECT | Required | Your Jira project key. For example, a project called My Test might have a project key of MYT. | MYT |
INSTANCE | Required | Your Jira hostname prefix, such as myorg in myorg.atlassian.net. | myorg |
ENVIRONMENT_NAME | Optional | If included, Harness updates the Jira Deployment field when there is a deployment to the specified environment. If omitted, Harness updates the Jira Build field. | production |
STATE | Optional | If included, Harness updates Jira only if builds/deployments achieve the specified status. Accepted values include: pending, in_progress, cancelled, failed, rolled_back, or successful.If omitted, Harness updates Jira for all build/deployments, regardless of status. | successful |
LOG_LEVEL | Optional | Either debug or info.Set to debug to print the response from Jira in the build logs. | debug |
Run your pipeline
After adding the Plugin step, save and run the pipeline. If you set LOG_LEVEL: debug, you can see the Jira response in the build logs.
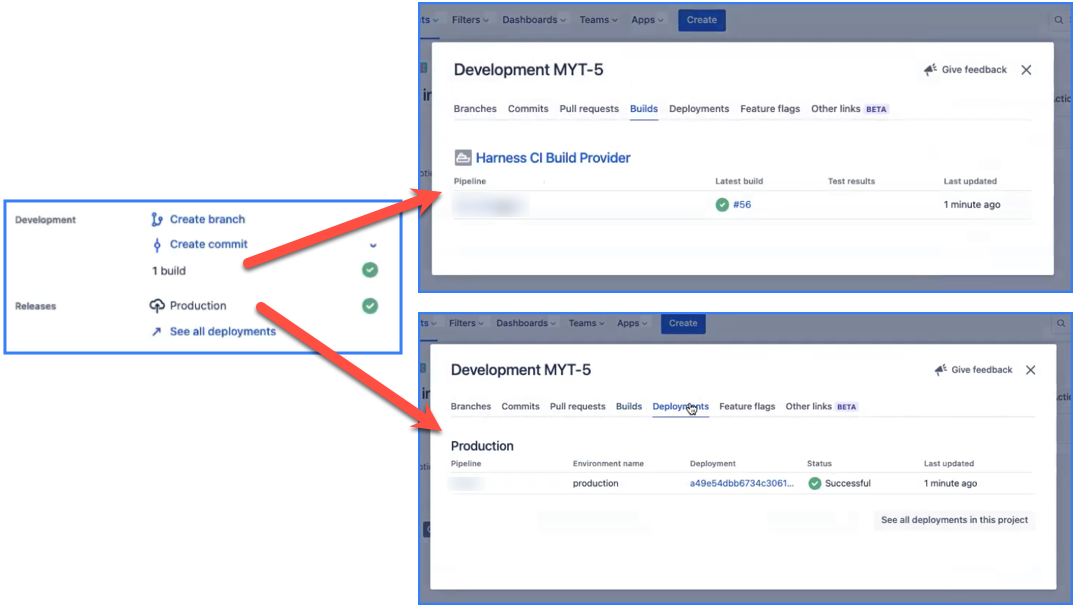
After the build runs, you can see updates to Build and Deployment fields on the Jira issue associated with the build. If you drill down into these fields, you can find links to the build in Harness.

The presence of the ENVIRONMENT_NAME setting in the Plugin step determines whether Harness updates the Deployment or Build field in Jira. If ENVIRONMENT_NAME is included, Harness updates the Deployment field. If ENVIRONMENT_NAME is excluded, Harness updates the Build field.
When the pipeline runs, Harness scans for a Jira issue number, such as [JIRA-1234], in the title of the PR or the latest commit message associated with the build.