Build and Push to ECR
This topic provides settings for the Build and Push to ECR step, which builds an image and pushes it to AWS ECR. Depending on the stage's build infrastructure, some settings may be unavailable or optional. Settings specific to containers, such as Set Container Resources, are not applicable when using the step in a stage with VM or Harness Cloud build infrastructure.
For more information, go to the following:
- AWS documentation: Pushing a Docker image
- Harness tutorial: Build and push a container image to Amazon ECR
- Harness documentation: Build and push an artifact
- Harness documentation: Useful techniques for Build and Push steps (Build without pushing, build multi-architecture images, use Harness expressions for tags, and set kaniko runtime flags)
With Kubernetes cluster build infrastructures, Build and Push steps use kaniko. Other build infrastructures use drone-docker. Kaniko requires root access to build the Docker image. It doesn't support non-root users.
If your build runs as non-root (runAsNonRoot: true), and you want to run the Build and Push step as root, you can set Run as User to 0 on the Build and Push step to use the root user for that individual step only.
If your security policy doesn't allow running as root, go to Build and push with non-root users.
Name
Enter a name summarizing the step's purpose. Harness automatically assigns an Id (Entity Identifier Reference) based on the Name. You can change the Id.
AWS Connector
Select the Harness AWS connector to use to connect to ECR.
This step supports all AWS connector authentication methods (AWS access key, delegate IAM role assumption, IRSA, and cross-account access), but an additional stage variable might be required to assume IAM roles or use ARNs.
The AWS IAM roles and policies associated with the AWS account for your Harness AWS connector must allow pushing to ECR. For more information, go to the AWS connector settings reference.
Stage variable required to assume IAM role or use ARNs
Stages with Build and Push to ECR steps must have a PLUGIN_USER_ROLE_ARN stage variable if:
- Your AWS connector's authentication uses a cross-account role (ARN). You can use
PLUGIN_USER_ROLE_ARNto specify the full ARN value corresponding with the AWS connector's ARN. - Your AWS connector uses Assume IAM Role on Delegate authentication. If your connector doesn't use AWS Access Key authentication, then the Build and Push to ECR step uses the IAM role of the build pod or build VM (depending on your build infrastructure). You can use
PLUGIN_USER_ROLE_ARNto select a different role than the default role assumed by the build pod/machine. This is similar tosts assume-role.
To add the PLUGIN_USER_ROLE_ARN stage variable:
In the Pipeline Studio, select the stage with the Build and Push to ECR step, and then select the Overview tab.
In the Advanced section, add a stage variable.
Enter
PLUGIN_USER_ROLE_ARNas the Variable Name, set the Type to String, and then select Save.For the Value, enter the full ARN value.
- For cross-account roles, this ARN value must correspond with the AWS connector's ARN.
- For connectors that use the delegate's IAM role, the ARN value must identify the role you want the build pod/machine to use.
Region
Define the AWS region to use when pushing the image.
The registry format for ECR is aws_account_id.dkr.ecr.region.amazonaws.com and a region is required. For more information, go to the AWS documentation for Pushing a Docker image.
Account Id
The AWS account ID to use when pushing the image. This is required.
The registry format for ECR is aws_account_id.dkr.ecr.region.amazonaws.com. For more information, go to the AWS documentation for Pushing a Docker image.
Image Name
The name of the image you are pushing. It can be any name.
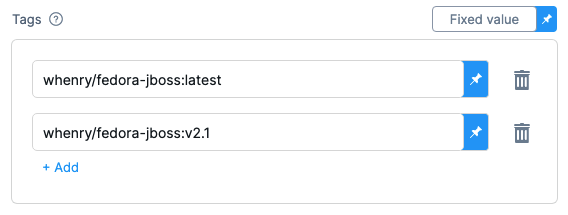
Tags
Add Docker build tags. This is equivalent to the -t flag.
Add each tag separately.
Base Image Connector
Select an authenticated connector to download base images from a Docker-compliant registry. If you do not specify a Base Image Connector, the step downloads base images without authentication. Specifying a Base Image Connector is recommended because unauthenticated downloads generally have a lower rate limit than authenticated downloads.
Optimize
With Kubernetes cluster build infrastructures, select this option to enable --snapshotMode=redo. This setting causes file metadata to be considered when creating snapshots, and it can reduce the time it takes to create snapshots. For more information, go to the kaniko documentation for the snapshotMode flag.
Dockerfile
The name of the Dockerfile. If you don't provide a name, Harness assumes the Dockerfile is in the root folder of the codebase.
Context
Enter a path to a directory containing files that make up the build's context. When the pipeline runs, the build process can refer to any files found in the context. For example, a Dockerfile can use a COPY instruction to reference a file in the context.
Labels
Specify Docker object labels to add metadata to the Docker image.
Build Arguments
The Docker build-time variables. This is equivalent to the --build-arg flag.

Target
The Docker target build stage, equivalent to the --target flag, such as build-env.
Remote Cache Image
Enter the name of the remote cache image, for example, app/myImage.
The remote cache repository must be in the same account and organization as the build image. For caching to work, the specified image name must exist.
Harness enables remote Docker layer caching where each Docker layer is uploaded as an image to a Docker repo you identify. If the same layer is used in subsequent builds, Harness downloads the layer from the Docker repo. You can also specify the same Docker repo for multiple Build and Push steps, enabling these steps to share the same remote cache. This can dramatically improve build times by sharing layers across pipelines, stages, and steps.
Run as User
With Kubernetes cluster build infrastructures, you can specify the user ID to use to run all processes in the pod if running in containers. For more information, go to Set the security context for a pod.
This step requires root access. You can use the Run as User setting if your build runs as non-root (runAsNonRoot: true), and you can run the Build and Push step as root. To do this, set Run as User to 0 to use the root user for this individual step only.
If your security policy doesn't allow running as root, go to Build and push with non-root users.
Set Container Resources
Set maximum resource limits for the resources used by the container at runtime:
- Limit Memory: The maximum memory that the container can use. You can express memory as a plain integer or as a fixed-point number using the suffixes
GorM. You can also use the power-of-two equivalentsGiandMi. The default is500Mi. - Limit CPU: The maximum number of cores that the container can use. CPU limits are measured in CPU units. Fractional requests are allowed; for example, you can specify one hundred millicpu as
0.1or100m. The default is400m. For more information, go to Resource units in Kubernetes.
Timeout
Set the timeout limit for the step. Once the timeout limit is reached, the step fails and pipeline execution continues. To set skip conditions or failure handling for steps, go to: