Map Argo projects to Harness GitOps projects
This topic describes how to add and manage multiple Argo CD projects within one Harness Project.
When you install a Harness GitOps Agent, Harness can import your existing Argo CD entities into Harness GitOps. We call this Bring Your Own Argo CD (BYOA).
With a non-BYOA setup, Harness installs Argo CD for you when you install a Harness GitOps Agent. For more information, go to Install a Harness GitOps Agent.
In addition, when you install the Harness GitOps Agent in your existing Argo CD cluster, you can map Argo CD projects to Harness Projects. Harness will import all the Argo CD project entities (applications, clusters, repos, etc) and create them in Harness automatically.
Also, whenever new entities are created in mapped Argo CD projects, they are added to Harness automatically.
Install the GitOps Agent at the account or org level
To map Argo CD projects to Harness Projects, you need to install the Harness GitOps Agent at the Harness account or org level. Then you can map the Argo CD projects to any of the Harness Projects in the account or org.
If you install the GitOps Agent at the Harness Project level, you can only map to the current Project.
In the following example, we will install the Agent at the Harness account level.
Mapping Argo CD projects to Harness Projects
The following sections describe how to map Argo CD projects to Harness Projects when installing a new Agent. Mapping Argo CD projects in an existing Agent is covered in Adding new mappings to existing Agent.
The following steps show you how to install a GitOps Agent into an existing Argo CD namespace and then map your existing projects to your Harness Project.
In your Harness account, click Account Settings.
click GitOps, and then click Agents.
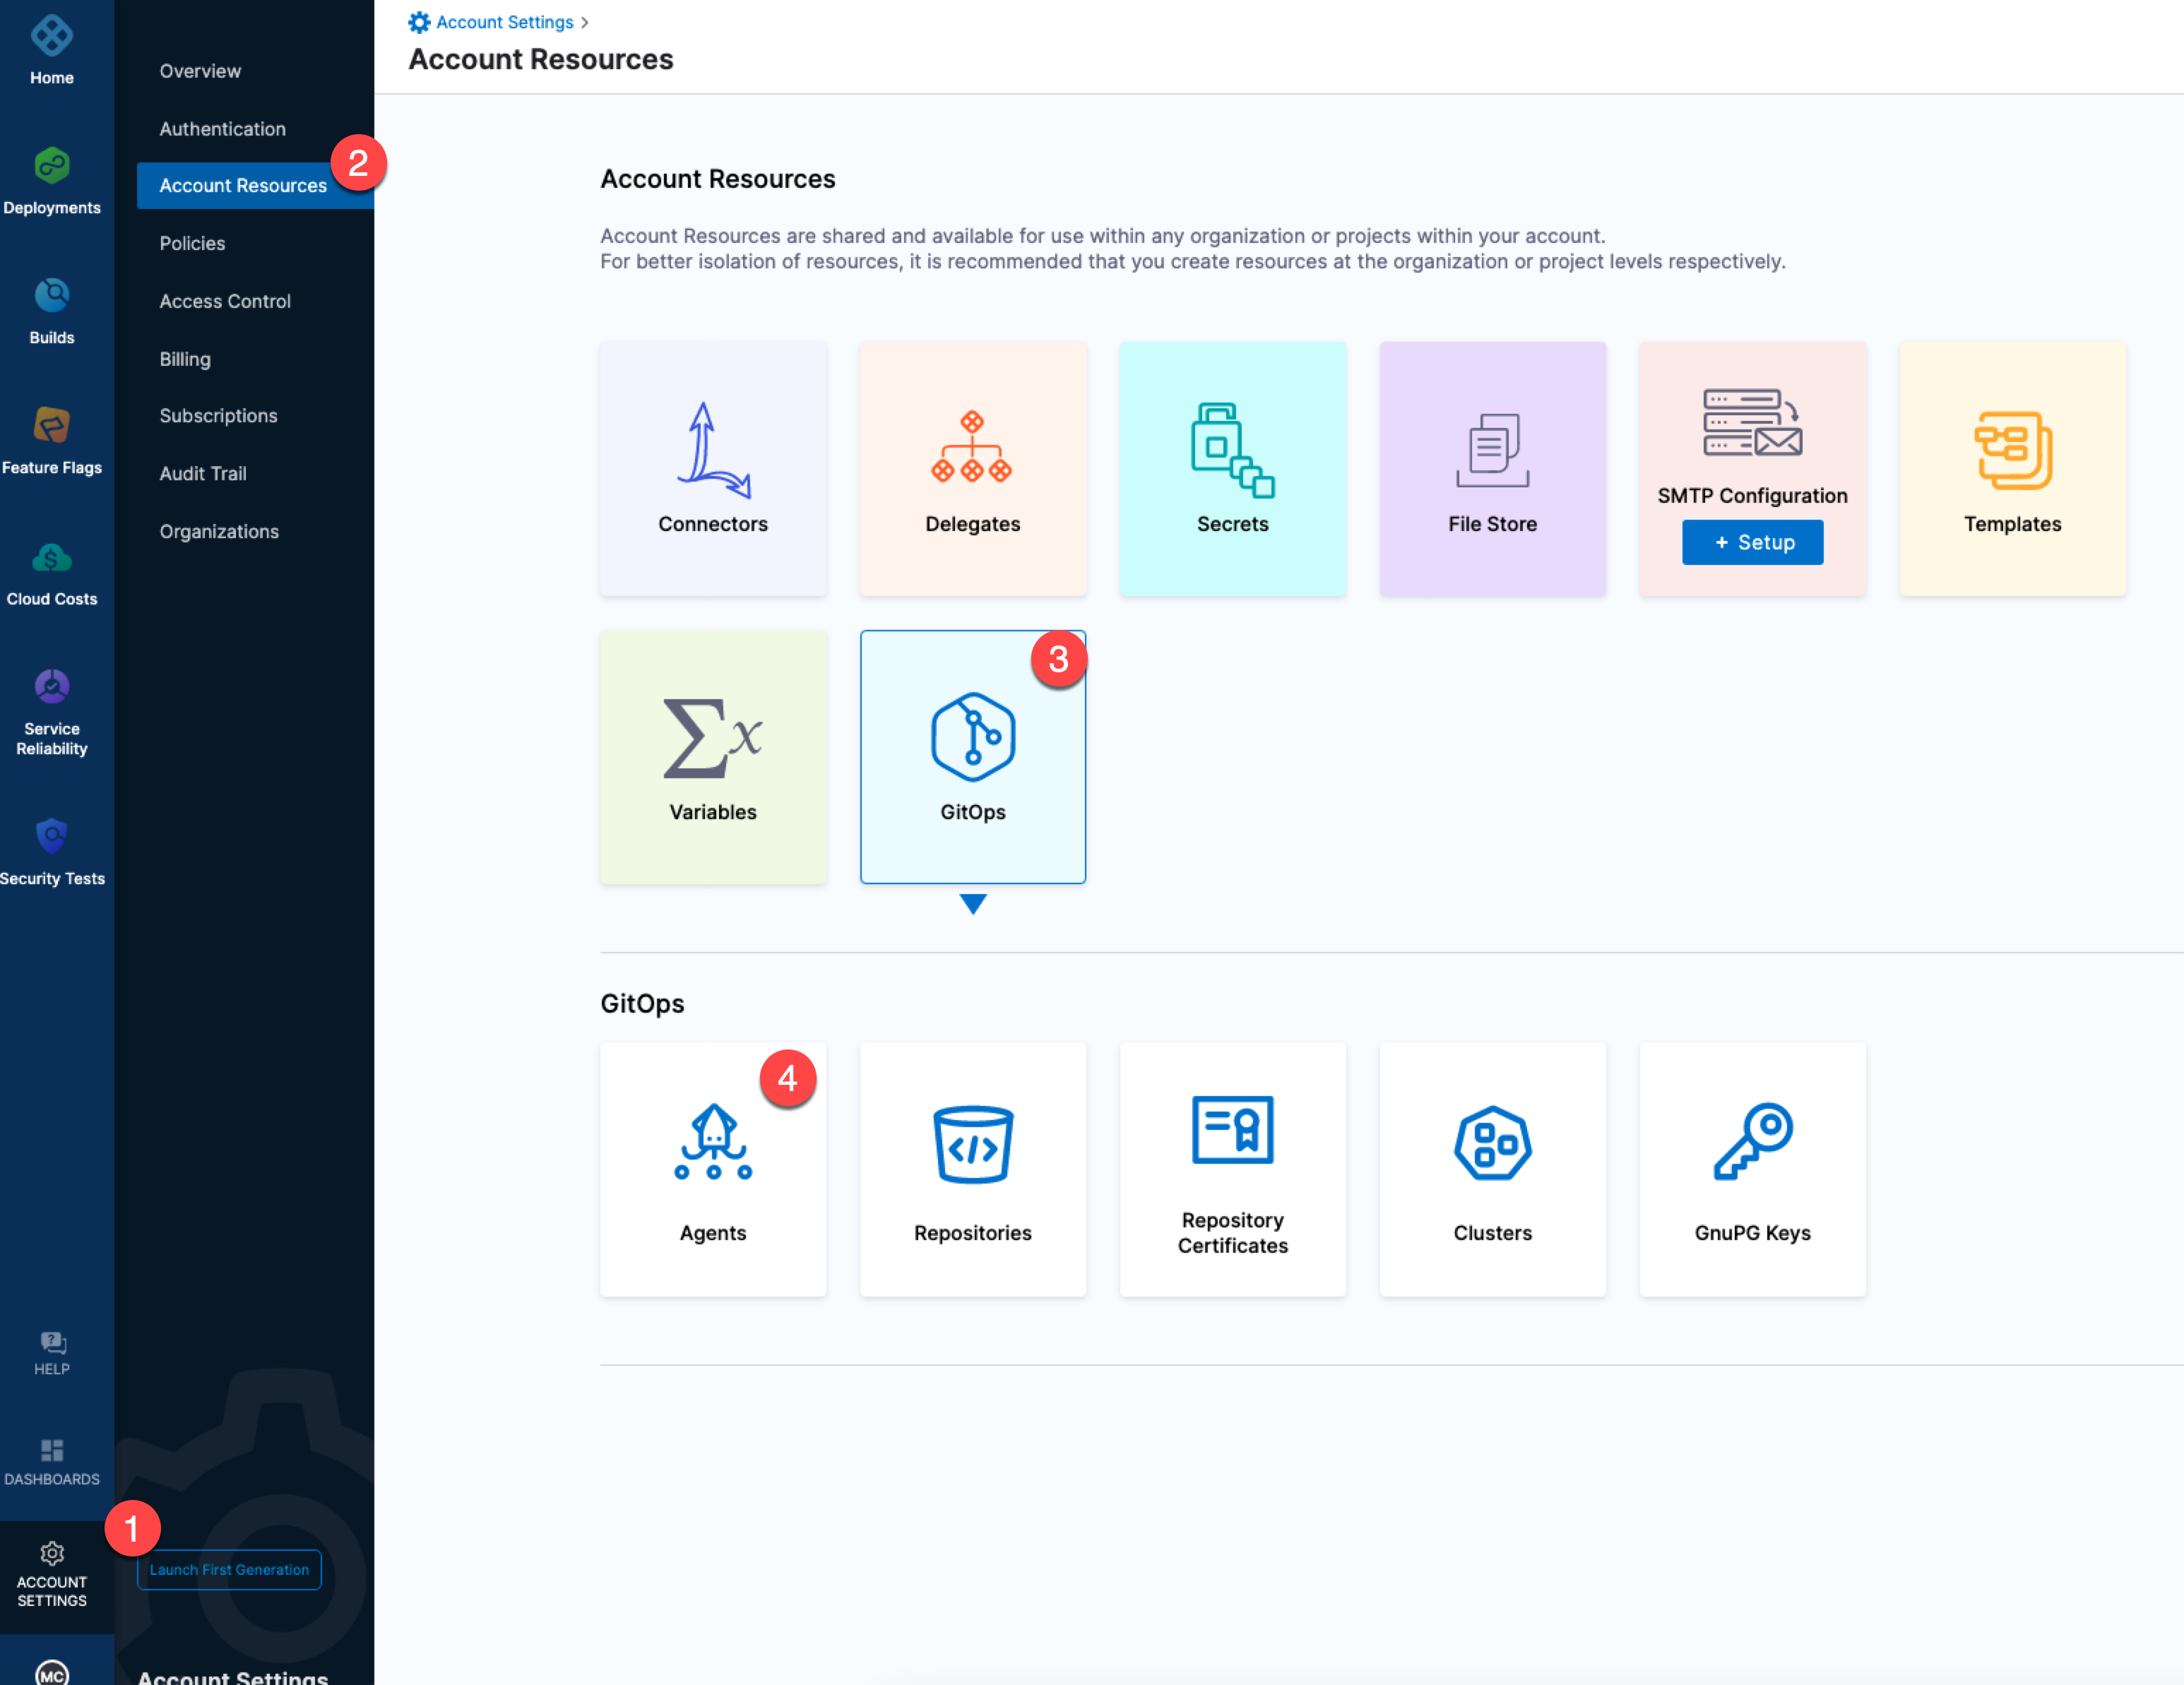
Click New GitOps Agent.
In Agent Installation, in Do you have any existing Argo CD instances, click Yes, and then click Start.
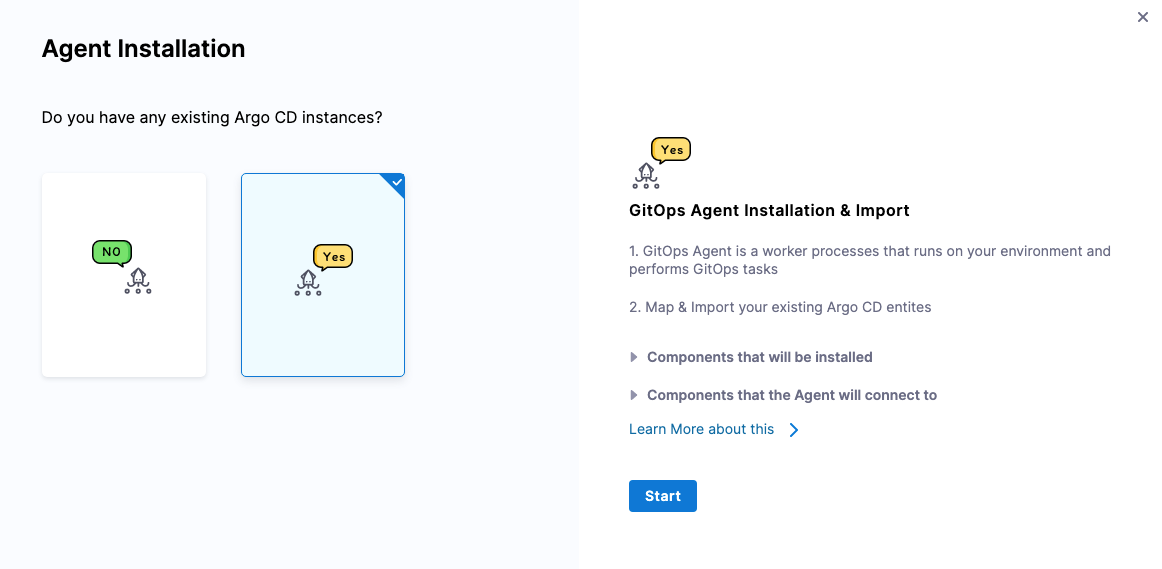
In Name, enter a name for your agent, such as byoa-agent.
In Namespace, enter the namespace where Argo CD is hosted. The default is argocd.
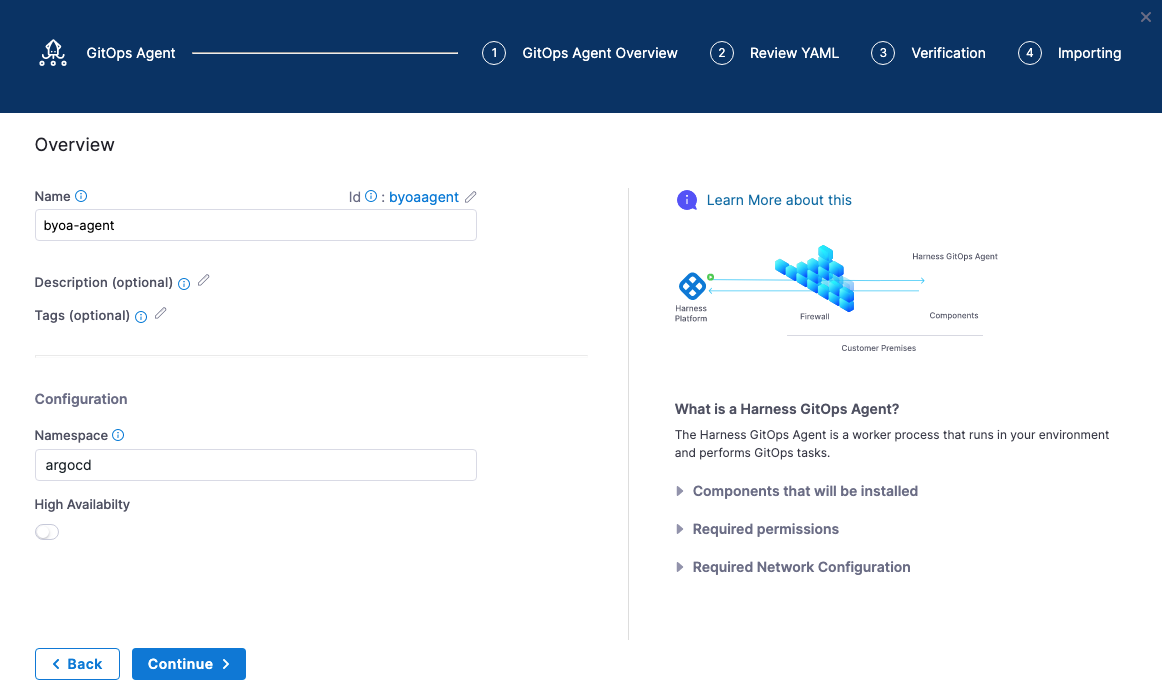
Click Continue.
In Review YAML, click Download & Continue.
Log into the cluster hosting Argo CD.
Run the install command provided in the Agent installer, such as
kubectl apply -f gitops-agent.yml -n argocd. You'll see output similar to this:serviceaccount/byoa-agent-agent created
role.rbac.authorization.k8s.io/byoa-agent-agent created
clusterrole.rbac.authorization.k8s.io/byoa-agent-agent created
rolebinding.rbac.authorization.k8s.io/byoa-agent-agent created
clusterrolebinding.rbac.authorization.k8s.io/byoa-agent-agent created
secret/byoa-agent-agent created
configmap/byoa-agent-agent created
deployment.apps/byoa-agent-agent created
configmap/byoa-agent-agent-upgrader created
role.rbac.authorization.k8s.io/byoa-agent-agent-upgrader created
rolebinding.rbac.authorization.k8s.io/byoa-agent-agent-upgrader created
serviceaccount/byoa-agent-agent-upgrader created
cronjob.batch/byoa-agent-agent-upgrader createdBack in the Harness GitOps Agent installer, click Continue.
The Agent has registered with Harness.
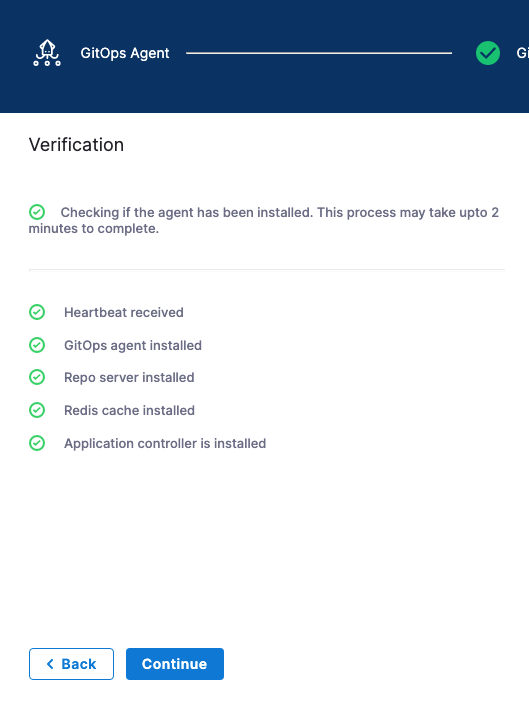
Click Continue. The Map Projects settings appear.
Map Projects
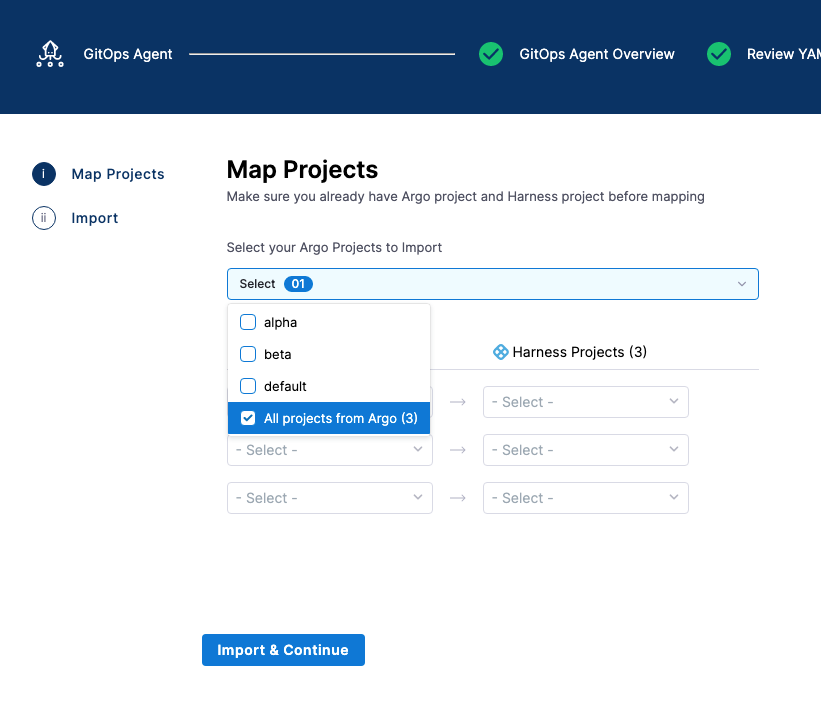
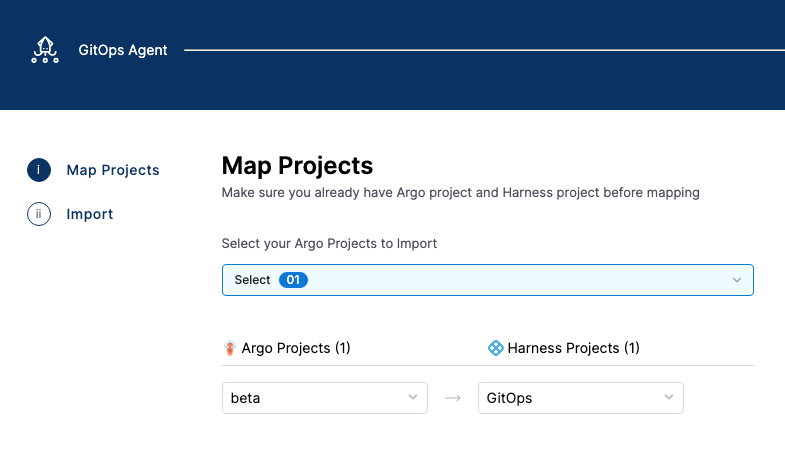
To map your existing Argo CD projects to Harness Projects, you simply select the Argo CD projects you want to use, and select the corresponding Harness Project to map.
In Map Projects, in Select your Argo Projects to Import, click the Argo CD projects you want to map.
In each row, select the Argo project and corresponding Harness Project.
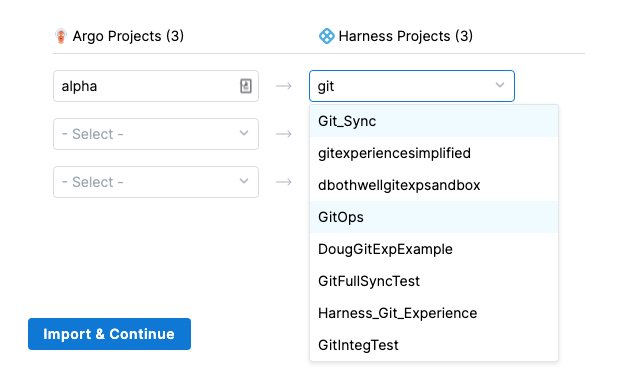
Do not map the same Argo CD project to multiple Harness Projects.
Click Import & Continue.
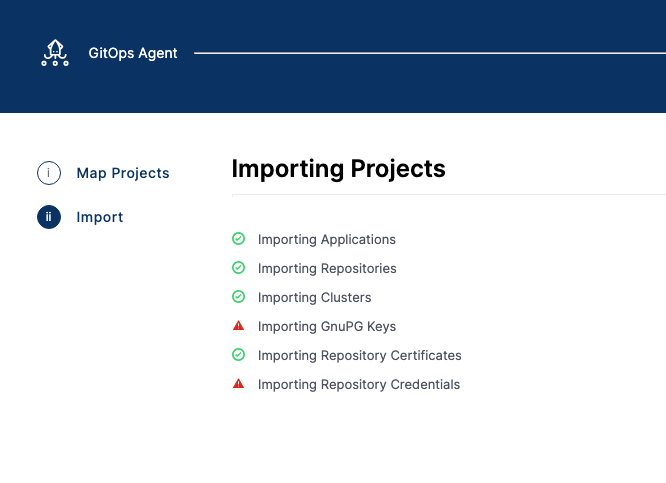
The Argo CD projects are imported.
Here's an example where the Argo CD applications, repositories, repository certs, and clusters are imported.
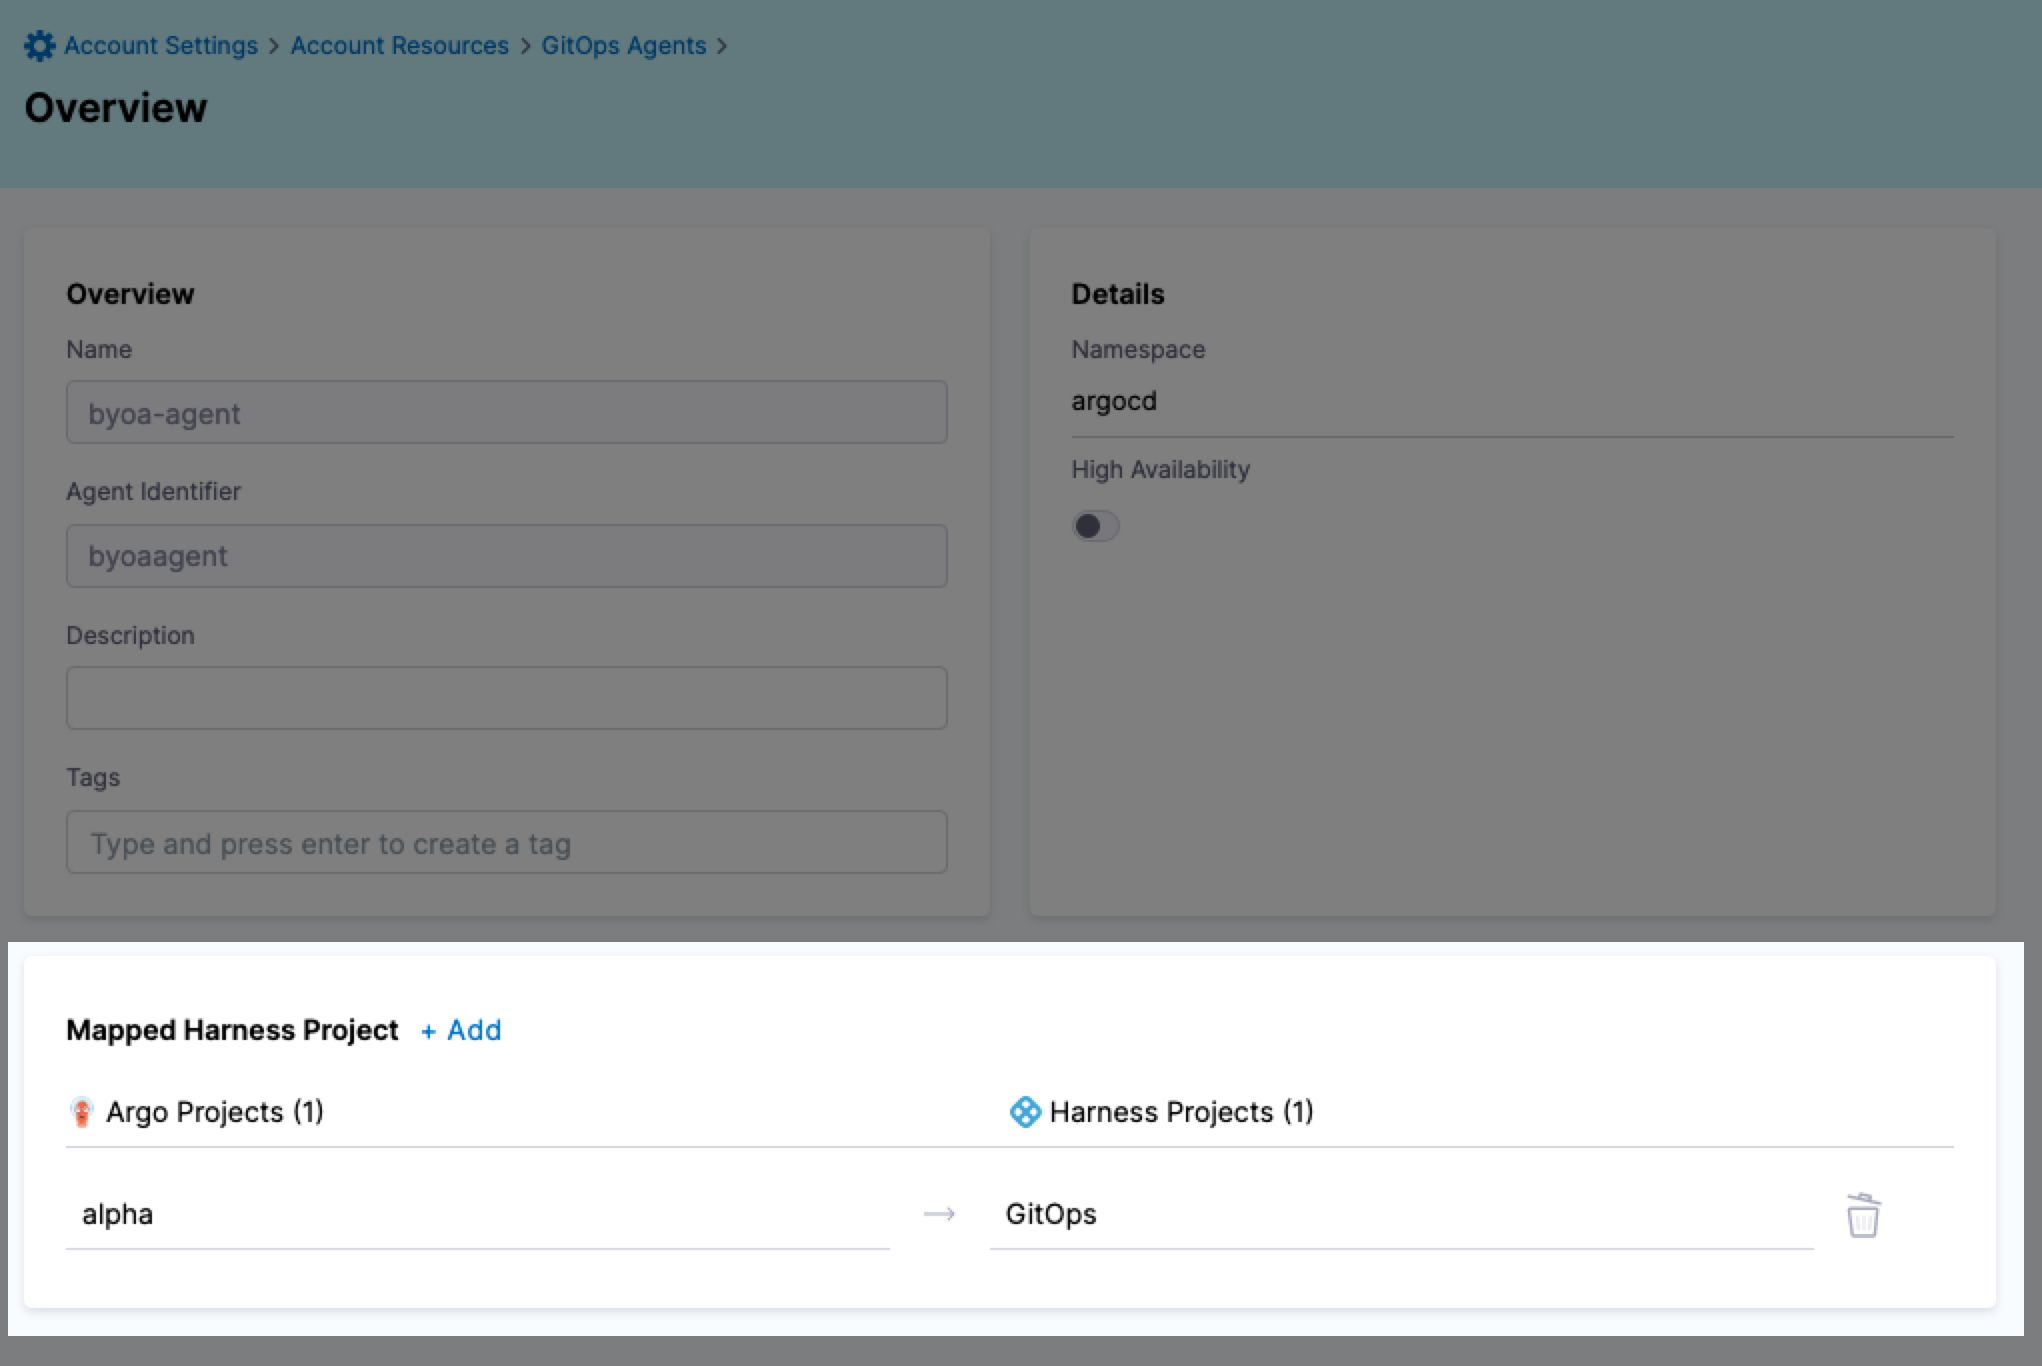
Click Finish. The mapping is displayed in the Agent details.
Click Save.
Verify mapping
Next, look in the mapped Harness Project to see the imported Argo CD entities.
In your Harness Project, click GitOps, and then click Applications. You can see the imported application.

Click Settings, and then click Repositories. You can see the imported repositories.
Click Settings, and then click Clusters. You can see the imported clusters.
Do the same for any other mapped project entities.
Adding new mappings to existing Agent
You can add new mappings to an existing Agent in the Agent's Mapped Harness Project settings.
In Harness, open an existing Agent.
Click Edit. In this example, I already have the Argo CD project alpha mapped to the Harness Project GitOps.

Let's add a new mapping.
In Mapped Harness Project, click Add.
In Map Projects, in Select your Argo Projects to Import, select the new Argo CD project to map. Do not select a project you have already mapped.
Map the new Argo CD project to a Harness Project and click Import & Continue. Do not re-map an existing mapping. Harness will throw an error.
When the import is complete, click Finish.
Both projects are now mapped.

Adding Argo CD entities to Harness automatically
When an Agent contains Argo CD project mappings to a Harness Project, any new entities added to the Argo CD project are added to the mapped Harness Project automatically.
Try adding a new Argo CD repository to the mapped Argo CD project.
Once it's saved in Argo CD, go to Harness and look at the GitOps Repositories in the mapped Harness Project. A new repo is added.
Automatically added Argo CD repositories
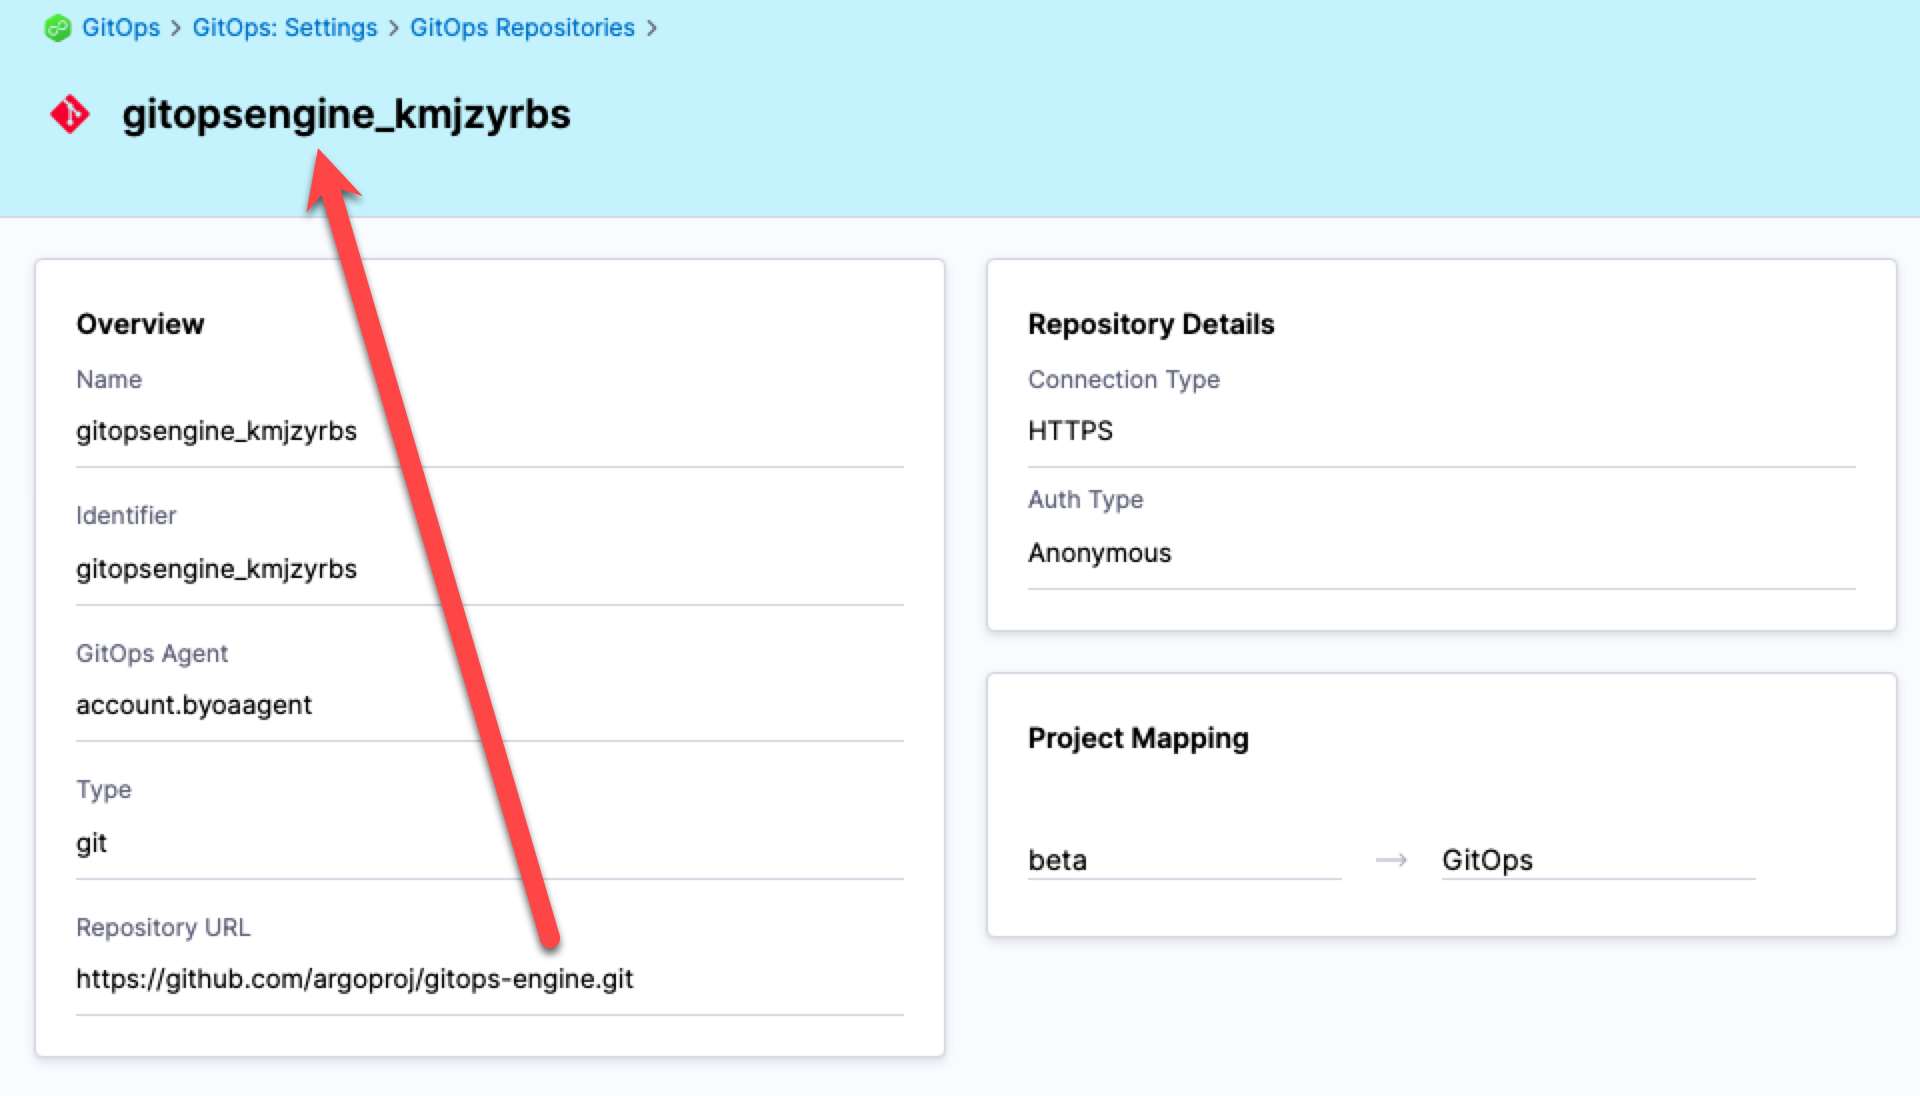
When adding Argo CD repositories, Harness automatically generates the name of Repository when it's added to Harness. This is necessary because Argo CD has no name setting for its repos.
The process for generating the name is: take the repo name, remove any dashes, and then add an underscore and a unique suffix.
For example, the Argo CD repo https://github.com/argoproj/gitops-engine.git is named gitopsengine_kmjzyrbs in Harness
Make sure that your Argo CD entities are visibile in the Harness UI
In some Argo CD versions, you are not required to specify a project for your entities. However, for the entities to be visible in the Harness UI, you must associate the entities with a project.
If you are unable to edit an entity from the Argo CD UI, you can edit that entity in the cluster so that they have a project and other required values. The entities are stored in different formats in the cluster. For example, clusters, repositories, and repository credential templates are stored in Secret, and GnuPG keys and repository certificates are stored in ConfigMap in the namespace in which Argo CD is installed.
Edit the respective secret of the entity and add the fields project and name in the data or stringData block. For examples, go to Manage an Argo CD configuration by using Harness GitOps.
Creating GitOps Clusters with multiple projects
When you have multiple Argo CD projects mapped to your Harness Project, you can choose which Argo CD project to use when you create a new GitOps Cluster in your Harness Project.
By default, in the Argo CD console, when you create a cluster it is not associated with an Argo CD project. You can add the cluster using the argocd cluster add CLI and its --project option.
Go to the Harness Project that is mapped to multiple Argo CD projects.
In Deployments, click GitOps, and then click Settings.
Click Clusters.
Click New Cluster.
Enter a name for the Cluster.
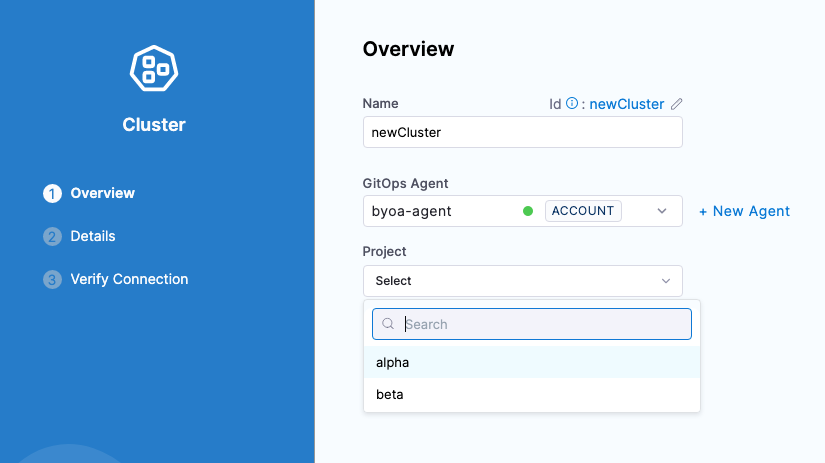
In GitOps Agent, select the Agent where you set up the mappings. The Project setting appears.
If the Agent has only 1 Argo CD project mapped, the Project setting is not shown.
In Project, select the Argo CD project with the cluster you want to import.
Click Continue.
Complete the regular steps for adding the resource.
When you are done, the Cluster will appear in the GitOps Cluster list.
Creating GitOps Repositories with multiple projects
When you have multiple Argo CD projects mapped to your Harness Project, you can choose which Argo CD project to use when you create a new GitOps Repository in your Harness Project.
Go to the Harness Project that is mapped to multiple Argo CD projects.
In Deployments, click GitOps, and then click Settings.
Click Repositories.
Click New Repository.
Select a repo type.
Enter a name for the Repository.
In GitOps Agent, select the Agent where you set up the mappings. The Project setting appears.
If the Agent has only 1 Argo CD project mapped, the Project setting is not shown.
In Project, select the Argo CD project with the repo you want to import.
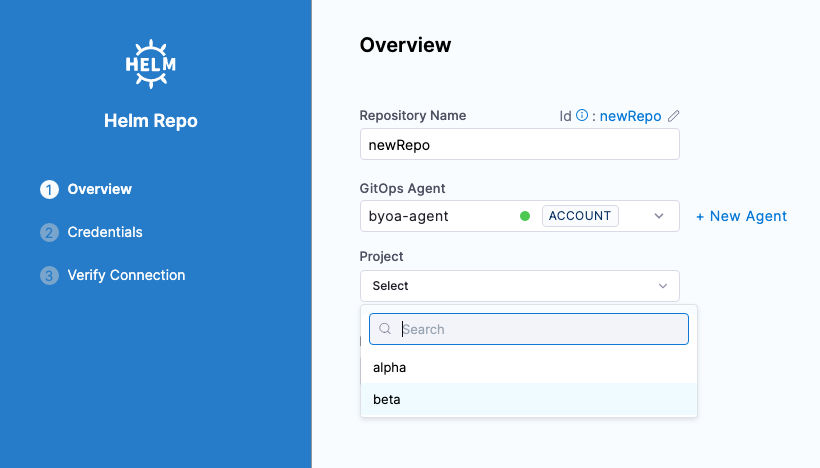
Enter the Repository URL and click Continue. You might have multiple repos in that Argo CD project. So the Repository URL is required.
Complete the regular steps for adding the resource.
When you are done, the Repository will appear in the GitOps Repositories list.
Creating GitOps Applications with multiple projects
When you have multiple Argo CD projects mapped to your Harness Project, you can choose which Argo CD project to use when you create a new GitOps Application in your Harness Project.
Go to the Harness Project that is mapped to multiple Argo CD projects.
In Deployments, click GitOps, and then click Applications.
Click New Application.
Enter a name for the new Application.
In GitOps Agent, select the Agent where you set up the mappings. The Project setting appears.
If the Agent has only 1 Argo CD project mapped, the Project setting is not shown.
In Project, select the Argo CD project with the application you want to import.
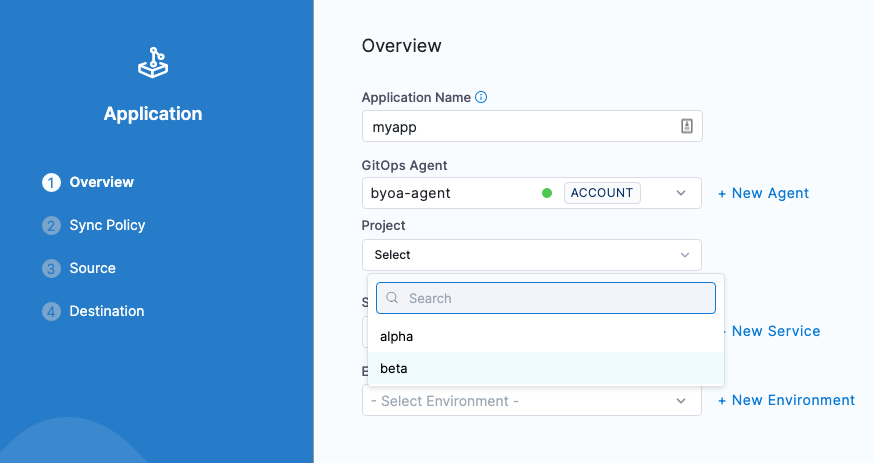
Select/create the Harness Service and Environment, and then click Continue.
Complete the regular steps for adding the resource.
When you are done, the Application will appear in the GitOps Applications list.
Notes
- Harness honors Argo CD project permissions. If the project selected for the Harness Application does not have permission for the repository or cluster, then Harness will return a permission error. You will need to go into Argo CD and adjust the projects scoped repositories and destinations.
- A non-BYOA setup does not support multiple Argo CD mappings to a single Harness Project. A non-BYOA setup is a setup where Harness installs Argo CD for you when you install a Harness GitOps Agent.
- If you need to uninstall a GitOps Agent, you can use
kubectl deletewith the same manifest you used to install it. For example,kubectl delete -f gitops-agent.yml -n argocd.